Sunday, 17 October 2021

Wednesday, 22 September 2021
Getting Started with Raspberry Pi Pico - Basic Tutorials to Learn Working with Raspberry Pi Pico Board
Recently Raspberry Pi Foundation introduced us to a microcontroller board, the Raspberry Pi Pico which comes with the Raspberry Pi Foundation's own silicon chip RP2040. The Raspberry Pi Pico is a low-cost microcontroller and its price is $4. Because it has a Dual-Core ARM processor along with GPIO & Digital/Analog peripherals, we can easily create micro to small-scale embedded applications.

Here is a list of tutorials to get started with the raspberry pi pico development board.
1. Getting started with Raspberry Pi Pico using MicroPython
Here is a list of tutorials to get started with the raspberry pi pico development board.
1. Getting started with Raspberry Pi Pico using MicroPython
This tutorial covers basic specifications and features of pico board and setting up micropython on the board.
2. Interfacing an OLED Display with the Raspberry Pi Pico Using Micropython
In this tutorial, we are going to interface an OLED display module with the Pico board. You will be able to perform an I2C communication on Raspberry Pi Pico at the end of this tutorial. Here, we are going to display some strings on an OLED display by using Micropython
3. Interfacing Ultrasonic Sensor with Raspberry Pi Pico and Displaying the distance on OLED display Using MicroPython
2. Interfacing an OLED Display with the Raspberry Pi Pico Using Micropython
In this tutorial, we are going to interface an OLED display module with the Pico board. You will be able to perform an I2C communication on Raspberry Pi Pico at the end of this tutorial. Here, we are going to display some strings on an OLED display by using Micropython
3. Interfacing Ultrasonic Sensor with Raspberry Pi Pico and Displaying the distance on OLED display Using MicroPython
In this tutorial, we will interface an ultrasonic sensor with the pico board and we are going to measure the distance of an object and then we will display the distance on the OLED display module using MicroPython.
4. ADC on Raspberry Pi Pico using MicroPython - Reading ADC Value and Displaying on OLED Display Module
4. ADC on Raspberry Pi Pico using MicroPython - Reading ADC Value and Displaying on OLED Display Module
In this tutorial, we will use the Pico board to perform an ADC conversion. The Raspberry Pi Pico has four 12-bit ADC channels, but one of them is connected to the internal temperature sensor. The remaining ADCs are located at GPIO26, GPIO27, and GPIO28 as ADC0, ADC1, and ADC2, respectively.
5. Interfacing LCD Display with Raspberry Pi Pico using Micropython
In this tutorial we are going to interface a Liquid Crystal Display (LCD) module with the Raspberry Pi Pico using Micropython. By the end of this tutorial, you will be able to display strings, characters on the LCD using Micropython.
5. Interfacing LCD Display with Raspberry Pi Pico using Micropython
In this tutorial we are going to interface a Liquid Crystal Display (LCD) module with the Raspberry Pi Pico using Micropython. By the end of this tutorial, you will be able to display strings, characters on the LCD using Micropython.
For more Raspberry pi Pico tutorials and interesting projects, visit: raspberry pi pico tutorials section
Tuesday, 27 July 2021
DIY Portable Ultrasonic Digital Ruler using ATtiny85 Microcontroller

Distance measurement of an object in the path of the person, equipment, or a vehicle or moving object is used in a large number of applications such as robotic movement control, vehicle control, blind man’s walking stick, medical equipment, etc. There are many methods available for distance measurement but measurement using Ultrasonic sensor is one of the cheapest among other options. In this project, we are going to use HC-SR04 Ultrasonic Sensor with ATtiny85 microcontroller IC and OLED display module to build a digital ultrasonic ruler.
For the circuit diagram, code and gerber files, please visit the project page: DIY Digital Ruler
For more electronics project, visit: projects page
Friday, 4 June 2021
How to Interface ECG Sensor with Arduino to Diagnose Various Medical Conditions

This DIY project tutorial covers AD8232 ECG sensor working and then connecting it with Arduino Uno to run some analysis on the resulting waveform for medical diagnosis. We will also see different types of ECG sensors in the market, the lead placement for a 3 lead ECG system, and the various medical conditions that can be identified by analyzing an ECG. Apart from this, we will also understand the use of its shutdown mode and analyze the ECG signal to obtain heart rate and heart rate variability as an application. Do note that ECG and EKG are the same things so the terms can be used interchangeably.
View the full project tutorial here
Watch below video to see the project in action.
Monday, 24 May 2021
DIY Raspberry Pi UPS HAT – An Uninterrupted Power Supply to Keep your Pi Safe during Power Failure

Raspberry Pi is a small or mini-computer that can be used in different types of small to large embedded, IoT, Industrial IoT applications. As this is a computer that could run different operating systems, a shutdown of this minicomputer is an important thing to ensure that everything is saved, the operating system properly ended all required tasks, and it is safe to turn the device off. Uncertain failure of power could damage the Pi as well as the operating system could also break down. Previously we have built many Raspberry Pi Projects and most of them needed to work 24x7 so, this project can act like a Raspberry pi UPS hat and can be used to keep our raspberry pi on during power failure.
View the full project tutorial:
DIY Raspberry Pi UPSMonday, 23 November 2020
DIY Portable Arduino Weighing Machine using Load Cell
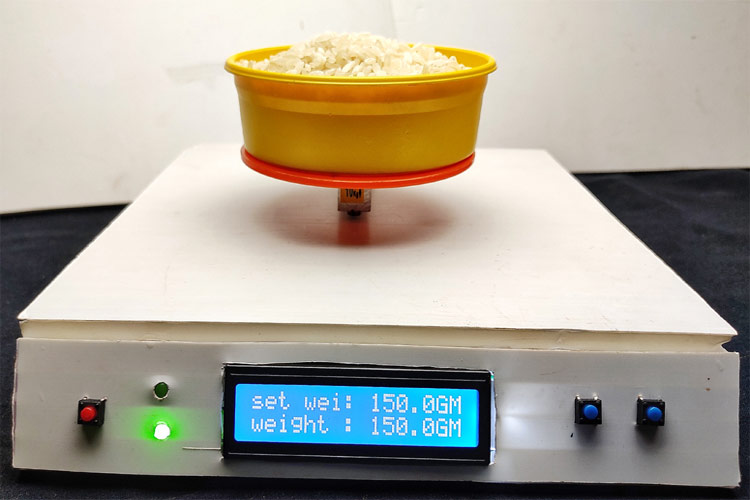
This weighing machine is perfect for local stores, where they pack items in bulk quantity. Like commercial products, our weight scale will have a zero button that zeroes out the scale. Also, It has an option to set weight for measurement, when the measuring weight reaches the set weight, a buzzer beeps fast and stops when the set weight equals the measuring weight. This way, the user can pack it just by hearing the sound and would not have to look at the display. As this is a very simple project, we will be building this very easily using components like Arduino and strain gauge load cell.
Watch the below video for the complete working of this Arduino Weighing Machine.
Get the circuit diagram, code and required instructions to build the project in this tutorial.
Thursday, 12 November 2020
Using Arduino Millis() Function for Multi-tasking

To learn how to make the circuit and write code for performing multitasking in the this detailed Arduino Millis tutorial
Below you can watch the demonstration video:
Subscribe to:
Posts (Atom)