Showing posts with label DIYProject. Show all posts

Monday, 13 July 2026

Raspberry Pi Object Detection Using AI Cloud API

Raspberry Pi Object Detection Using CircuitDigest Cloud

Imagine a device that can look at the world around it and instantly recognize everyday objects like laptops, phones, bottles, people, or vehicles. That's exactly what this Raspberry Pi Object Detection project does. Even better, you don't need to collect thousands of images, label datasets, or train a machine learning model.

Instead, the Raspberry Pi captures an image using a USB camera and sends it to the CircuitDigest Cloud AI API. Within seconds, the cloud analyzes the image and returns the detected objects along with their names, confidence scores, and bounding box coordinates.

How the System Works

The project uses a Raspberry Pi connected to a USB camera to capture images in real time. Images can be captured manually using the keyboard or automatically at fixed intervals, making the system suitable for both testing and continuous monitoring.

Once an image is captured, it is converted into JPEG format and securely uploaded to the CircuitDigest Cloud. The AI model processes the image, detects all supported objects, and sends the results back to the Raspberry Pi. The terminal then displays the object names, confidence percentages, and the total number of detected objects, giving you an instant overview of everything present in the scene.

Hardware Required

One of the biggest advantages of this project is its simplicity. You only need:

  • Raspberry Pi
  • USB Camera
  • MicroSD Card
  • Power Supply

Since the heavy AI processing happens in the cloud, the Raspberry Pi simply captures images and communicates with the API, keeping the hardware requirements minimal.

Why Use CircuitDigest Cloud?

Traditional object detection projects require collecting datasets, annotating images, training deep learning models, converting them into TensorFlow Lite or ONNX formats, and optimizing them for embedded devices. This process often takes days or even weeks.

With CircuitDigest Cloud, all those steps are eliminated. The object detection model is already trained and ready to use. Simply insert your API key, connect the camera, and start detecting objects within minutes. As the cloud model improves over time, your project automatically benefits without requiring firmware updates or retraining.

Key Features

  • Real-time object detection using AI
  • No dataset collection or model training
  • Detects multiple objects in a single image
  • Displays object names and confidence scores
  • Supports over 75 predefined object classes
  • Simple Python implementation with OpenCV
  • Works with standard USB webcams

Applications

This project can be used for smart surveillance systems, inventory monitoring, warehouse automation, robotics, smart retail, classroom AI demonstrations, industrial inspection, and many other computer vision applications. It also serves as an excellent learning platform for anyone interested in AI-powered vision systems without diving into complex machine learning workflows.

The Raspberry Pi Object Detection System demonstrates how easy modern AI projects have become with cloud-based inference. Instead of spending time building and training machine learning models, you can focus on developing practical applications that work immediately.

Whether you're a beginner exploring computer vision or a maker building your next Raspberry Pi project, this cloud-powered object detection system offers a fast, affordable, and highly scalable way to add intelligent vision to your projects.

https://circuitdigest.com

Robotics Projects |Arduino Projects | Raspberry Pi Projects|

Friday, 26 June 2026

ESP32-CAM Parking Space Detection System Using AI Cloud API

Parking Space Detection System Using ESP32-CAM with CircuitDigest Cloud
Finding an empty parking space in a busy parking lot can be frustrating. This ESP32-CAM parking space detection system project solves that problem by building a smart parking space detection system using an ESP32-CAM and the CircuitDigest Cloud AI API. Instead of running a complex AI model on the microcontroller, the ESP32-CAM captures an image and sends it to the cloud for analysis. Within seconds, the system identifies occupied and vacant parking spaces and returns the result, making parking management faster and more efficient.

How the System Works

Circuit Diagram of Parking Detection

The system starts when a vehicle approaches the entrance. An ultrasonic sensor detects the vehicle and triggers the ESP32-CAM to capture an image of the parking area. The image is uploaded securely to the CircuitDigest Cloud using an HTTPS request.

The cloud-based AI processes the image and counts the number of occupied and available parking spaces. Once the analysis is complete, the result is sent back to the ESP32. If a parking space is available, the servo motor opens the entrance gate automatically. If the parking area is full, the gate remains closed. Parking status and confidence values are also displayed in the Serial Monitor for monitoring and debugging.

Hardware Used

Hardware Connection of Parking Detection

The project uses simple and affordable hardware components:

  • ESP32-CAM
  • ESP32 Development Board
  • HC-SR04 Ultrasonic Sensor
  • Micro Servo Motor
  • Breadboards
  • Jumper Wires

Since the ESP32-CAM includes both a camera and Wi-Fi connectivity, no additional communication modules are required.

Why Use Cloud AI?

Output Image

Running AI models directly on an ESP32-CAM is difficult because of its limited memory and processing power. Cloud-based inference removes this limitation by performing all image processing on powerful servers.

This approach also eliminates the need to collect datasets, label images, train machine learning models, or optimize neural networks. Developers can simply upload an image and receive accurate parking detection results within seconds.

Key Features

  • Detects occupied and vacant parking spaces automatically
  • Opens the gate only when parking is available
  • Uses cloud AI with no model training required
  • Wireless image upload through built-in Wi-Fi
  • Fast detection with real-time results
  • Easy to integrate into larger smart parking systems

Real-World Applications

This system can be used in apartment complexes, office buildings, shopping malls, educational institutions, and smart city parking projects. It can also be integrated with IoT dashboards, mobile applications, and automated parking guidance systems to provide real-time parking availability.

The ESP32-CAM Parking Space Detection System is a simple yet powerful example of combining IoT with cloud-based AI. By offloading image processing to the cloud, the project delivers accurate parking detection without the complexity of training machine learning models. It is an excellent solution for building affordable, scalable, and intelligent parking systems using readily available hardware.

https://circuitdigest.com

Robotics Projects |Arduino Projects | Raspberry Pi Projects|

Wednesday, 27 May 2026

ESP32-CAM Helmet Detection Using CircuitDigest Cloud

Helmet Detection with ESP32-Cam using CircuitDigest cloud

Road safety monitoring is becoming increasingly important, especially in busy traffic areas where manually checking every rider is nearly impossible. This ESP32-CAM Helmet Detection project offers a smart and affordable solution by combining the ESP32-CAM module with the CircuitDigest Cloud AI API.

Instead of running heavy machine learning models directly on the ESP32-CAM, the system uses cloud-based AI processing. The ESP32-CAM captures an image, uploads it to the CircuitDigest Cloud, and receives helmet detection results within seconds. The system can identify helmeted riders, riders without helmets, and even count motorbikes in the frame.

How the ESP32-CAM Helmet Detection System Works

The workflow of this smart helmet detection system is simple and efficient.

When the system powers ON:

  • A green LED glows for a few seconds, indicating that the system is ready.
  • A red LED then turns ON briefly before image capture.
  • The ESP32-CAM captures a JPEG image and uploads it securely to the CircuitDigest Cloud API.

The cloud server processes the image using AI object detection models and returns results in JSON format. These results are sent as a WhatsApp alert with the captured image and helmet status.

The best part is that no AI model training is required. The CircuitDigest Cloud already provides a ready-to-use API endpoint.

Components Required

Circuit Diagram of Helmet Detection with ESP32 Cam

This project uses only a few components:

  • ESP32-CAM Module
  • Red LED
  • Green LED
  • Breadboard
  • Jumper Wires

If you are using a standard ESP32-CAM board without onboard USB, you will also need an FTDI programmer for code upload.

Why Use Cloud-Based AI Instead of Local AI?

Running object detection models directly on microcontrollers usually requires high memory and processing power. Since the ESP32-CAM has limited resources, cloud AI processing becomes a better option.

Advantages of Cloud AI:

CircuitDigest Home Page
  • Faster detection
  • Better accuracy
  • No model training required
  • Lower hardware cost
  • Easy API integration

This makes the project beginner-friendly while still delivering professional-level results.

Hardware Setup

The ESP32-CAM is connected to two LEDs for system indication:

  • Green LED → System ready
  • Red LED → Image capture phase

After uploading the code, the ESP32-CAM automatically connects to WiFi and starts the detection process.

ESP32-CAM Helmet Detection Code

The Arduino code handles:

  • WiFi connection
  • Camera initialization
  • HTTPS image upload
  • JSON response handling
  • WhatsApp notification sending

The image is uploaded securely using multipart/form-data requests, along with the API authentication key.

Once the cloud server processes the image, the ESP32-CAM extracts the result and sends an alert if a rider is detected without a helmet.

WhatsApp Alert Feature

CircuitDigest Cloud API Helmet Detection

One of the most interesting parts of this project is the WhatsApp alert system. Whenever a rider without a helmet is detected, the system sends:

  • Helmet status
  • Captured image
  • Location details
  • Timestamp

This makes the setup useful for traffic monitoring and smart surveillance applications.

Applications of Helmet Detection System

This ESP32-CAM AI project can be used in:

  • Traffic monitoring systems
  • Smart city surveillance
  • Industrial safety monitoring
  • Parking areas
  • Campus safety systems

This ESP32-CAM Helmet Detection project demonstrates how cloud AI can simplify complex computer vision tasks on low-cost hardware. By combining the ESP32-CAM with CircuitDigest Cloud APIs, you can build a smart and practical helmet detection system without expensive processors or AI training.

https://circuitdigest.com 

Robotics Projects |Arduino Projects | Raspberry Pi Projects|

Saturday, 16 May 2026

Voice Controlled Drone Using ESP32 and Python

ESP32 Voice Controlled Drone with LiteWing using Python

What if you could fly a drone just by talking to it? That’s exactly what this project does. Using an ESP32 based LiteWing drone, Python, and offline speech recognition, this setup allows the drone to respond to simple voice commands like “takeoff,” “forward,” and “land.”

Instead of using a traditional remote controller filled with joysticks and switches, the drone listens to spoken commands through a microphone and performs actions in real time. The result feels much more natural, interactive, and fun.

How ESP32 Voice Controlled Drone Works

Voice Controlled Drone System Architecture

The project uses two main parts:

  • LiteWing ESP32 Drone
  • Laptop or PC running the voice-control program

The microphone captures the user’s voice, and the audio is processed using the Vosk speech recognition engine. Vosk converts speech into text completely offline, meaning no internet connection is required.

Once a command is recognized, Python sends the instruction to the drone through Wi-Fi using the LiteWing library. The drone then performs the requested action instantly.

Supported commands include:

  • Takeoff
  • Land
  • Forward
  • Backward
  • Left / Right
  • Up / Down
  • Turn left / Turn right

The system can even control the drone LEDs with commands like:

  • Red
  • Blue
  • Green
  • White

Because the speech recognition works locally on the laptop, the response time remains fast and reliable.

Hardware Used

The hardware setup is surprisingly simple.

Main components:

  • LiteWing ESP32 Drone
  • Positioning Module
  • Laptop or PC
  • Microphone

The positioning module helps stabilize the drone and improves movement accuracy during flight.

Software and Libraries

The project is developed in Python and uses:

  • PyAudio for microphone input
  • Vosk for offline speech recognition
  • LiteWing Python library for drone communication

One important detail is that the laptop connects directly to the drone’s Wi-Fi access point. No cloud service or internet connectivity is needed during operation.

Why Offline Speech Recognition?

Instead of using cloud-based voice assistants, the project uses offline speech recognition for several reasons:

  • Faster response time
  • Better privacy
  • No internet dependency
  • More reliable communication

The developers also switched to an Indian English Vosk model to improve command recognition accuracy for local accents.

Applications

This project is not only fun but also a great example of human-machine interaction.

Possible applications include:

  • Educational robotics
  • Hands-free drone operation
  • Interactive AI systems
  • Research and experimentation
  • Accessibility-focused robotics projects

This Voice Controlled Drone project combines ESP32 drone technology, Python programming, and AI-based speech recognition into one exciting setup. It transforms drone flying into a much more interactive experience while remaining simple enough for students, makers, and hobbyists to explore.

If you enjoy robotics, or drone projects, this is a fantastic hands-on project to experiment with.

https://circuitdigest.com 

Robotics Projects |Arduino Projects | Raspberry Pi Projects|

Monday, 20 April 2026

Raspberry Pi Pico Text-to-Speech Using AI (Wit.ai)

Raspberry Pi Pico Text to Speech using AI

Turning text into speech sounds simple - until you try doing it on a microcontroller. Devices like the Raspberry Pi Pico don’t have the processing power or memory to generate natural speech on their own. That’s where this project gets interesting. Instead of forcing the Pico to do heavy work, we let the cloud handle it.

Why This Approach Works

The Raspberry Pi Pico W is great for embedded projects, but it’s not built for audio processing. Generating realistic speech requires complex models and significant memory - something microcontrollers simply don’t have.

So instead, this project uses a cloud-based Text-to-Speech system. The Pico sends text over WiFi to an online service, and that service converts it into speech and sends back audio. The Pico just plays it. Simple, efficient, and practical.

What Powers the Speech?

WitAi Homepage

The project Raspberry Pi Pico Text to Speech using AI uses Wit.ai, a platform developed by Meta that handles speech processing through APIs. You send text via HTTPS, and it returns audio in real time.

This setup gives you:

  • Natural-sounding voice output
  • Support for multiple languages
  • No heavy processing on the Pico

And since everything runs in the cloud, updating voices or features doesn’t require changing your hardware.

Hardware Setup

Rpi Pico WitAITTS Component

The hardware is minimal and beginner-friendly:

  • Raspberry Pi Pico W
  • MAX98357A audio amplifier
  • Speaker (4Ω or 8Ω)
  • Breadboard and jumper wires

The amplifier connects using I2S pins, allowing digital audio from the Pico to be converted into sound through the speaker.

How It Actually Works

The workflow is clean and easy to follow:

  1. The Pico connects to WiFi
  2. You send text (via Serial Monitor or code)
  3. The Pico sends this text to Wit.ai
  4. Wit.ai converts it into speech
  5. Audio is streamed back to the Pico
  6. The speaker plays the sound instantly

What’s nice here is that the audio is streamed, not fully downloaded first. That means faster response and less memory usage.

Code Logic (In Simple Terms)

The program creates a TTS engine, connects to WiFi, and authenticates using a token from Wit.ai.

Then:

  • You set voice, speed, and pitch
  • Send text using a simple function
  • The system handles the rest automatically

It’s mostly plug-and-play once configured.

Where You Can Use This

This project isn’t just a demo. It can actually be used in real applications:

  • Smart home voice alerts
  • Talking IoT devices
  • Accessibility tools
  • Educational kits
  • Notification systems

Once you get the basics working, you can connect it with sensors, APIs, or automation systems.

This project shows how powerful a simple idea can be when done right. Instead of pushing hardware limits, it uses the cloud intelligently.

The result?
A lightweight system that delivers clear, natural speech using minimal components.

If you’re working with microcontrollers and want to add voice output without overcomplicating things, this is one of the cleanest ways to do it.

https://circuitdigest.com 

Robotics Projects |Arduino Projects | Raspberry Pi Projects|

Saturday, 11 April 2026

Build a Wi-Fi GPS Tracker with Geofencing

GPS Tracker with Geofence Using Xiao ESP32 S3

Traditional GPS trackers are expensive to build- they typically require a SIM card, a GSM module, and a cellular data plan just to send a location ping. For hobbyists and engineers building prototypes, that overhead kills momentum fast.

This project Send SMS Alert using Seeed Studio XIAO ESP32 changes the equation entirely. Using the Seeed Studio XIAO ESP32-S3 paired with a Neo-6M GPS module, you can build a fully functional, real-time GPS tracker that transmits over Wi-Fi - no SIM card, no GSM module, no cellular bill.

The system connects to the free GeoLinker cloud platform by Circuit Digest, which stores location history and visualises your route on an interactive map. The standout feature is built-in geofencing with SMS alerts - the device monitors a virtual boundary and fires a text message the moment it is crossed, including the exact coordinates of the breach.

It even buffers data locally when Wi-Fi drops, syncing automatically once reconnected. For under a few dollars in hardware and zero in subscription fees, this is one of the most capable entry-level trackers you can build.

Key Features

Workflow of GPS Tracker

•No SIM card or GSM module required - transmits over Wi-Fi
•Real-time location updates every 15 seconds (adjustable 1- 60 s)
•Geofencing with configurable radius (10 – 5,000 m)
•SMS alerts with exact coordinates on boundary breach
•Offline data buffering - no location data lost on Wi-Fi drop
•Free GeoLinker cloud - 10,000 data points at no cost
•Interactive route map with full location history

Components Required

Hardware Setup of GPS Tracker

Component

1. XIAO ESP32-S3
2. Neo-6M GPS module
3. External GPS antenna
4. Breadboard
5. Connecting wires

Software

• Arduino IDE
• GeoLinker Library - cloud communication
• TinyGPSPlus Library - NMEA sentence parsing
• WiFiClientSecure - HTTPS connections

Setup Overview

1.Wire the hardware. Connect Neo-6M TX → GPIO 44 (RX) and RX → GPIO 43 (TX) on the XIAO. Power the module from the 5V and GND pins. Attach the external GPS antenna.

2.Create a GeoLinker account. Sign up at circuitdigest.cloud, navigate to My Account → API Keys, and generate your free key. New accounts receive 10,000 data points at no cost.

3.Configure the firmware. Paste your Wi-Fi credentials, API key, device ID, and home coordinates into the sketch. Set your update interval (default 15 s) and geofence radius (default 50 m).

4.Flash and test. Upload via Arduino IDE. The ESP32-S3 will connect to Wi-Fi, parse NMEA sentences from the GPS module, and push coordinates to GeoLinker every 15 seconds.

5.Watch the map. Open your GeoLinker dashboard to see live position dots and route history. Cross the geofence boundary to verify the SMS alert fires with your current coordinates.

How Geofencing Works

The firmware uses the Haversine formula to calculate the straight-line distance between the device's current GPS position and the home coordinates defined in the code.

•Distance > geofence radius → SMS alert sent with current coordinates
•Device returns inside boundary → alert flag resets
•Device crosses boundary again → new SMS alert fires

The SMS is delivered via the Circuit Digest Cloud SMS API to the mobile number specified in your GeoLinker account, containing exact latitude and longitude at the moment of breach.

Real - World Applications

  • Vehicle & Fleet Management
  • Asset Protection
  • Child Safety
  • Elderly Monitoring
  • Pet Tracking

https://circuitdigest.com 

Robotics Projects |Arduino Projects | Raspberry Pi Projects|

Friday, 24 May 2024

Building an Automatic Plant Watering System Without Arduino


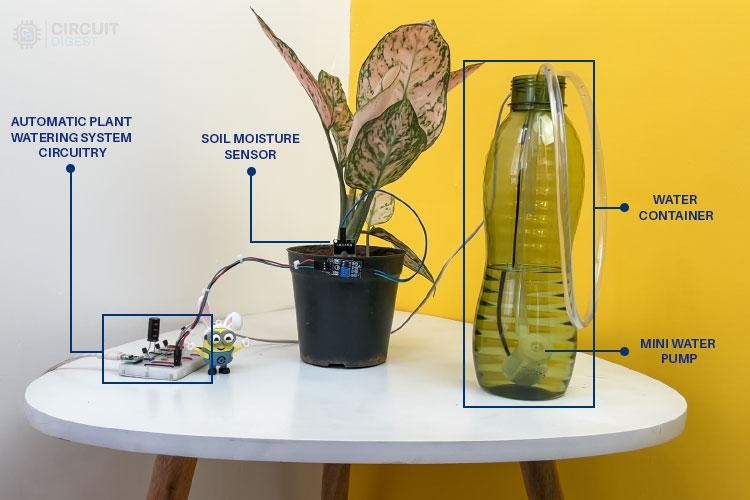
In today's era of embracing eco-friendly solutions, nurturing plants has become essential for a healthier lifestyle. However, ensuring plants receive adequate watering poses a challenge, especially amidst busy schedules. To address this, we've developed a straightforward automatic plant watering system that operates without Arduino. Our aim is to simplify plant care with minimal components and reduce complexity for all users.


Importance:

Consistent watering is crucial for plant health, yet it can be difficult to maintain with hectic lifestyles. Our system offers a hands-free solution, ensuring plants receive proper moisture even when owners are absent. By eliminating Arduino, we've made plant care more accessible to everyone.


Advantages:

  • User-Friendly: Requires no coding and minimal components, suitable for beginners.

  • Cost-Effective: Uses commonly available parts, making it affordable.

  • Adjustable Delay Function: Allows customization of watering intervals.

  • Compact Design: Suitable for indoor and outdoor use.


Operation:

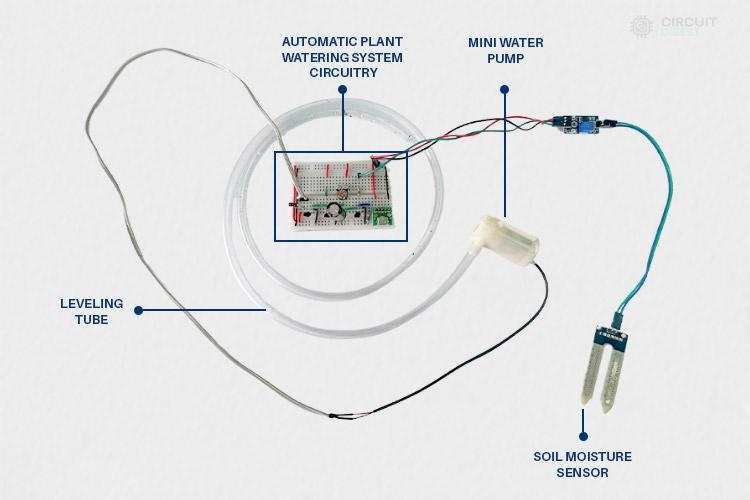
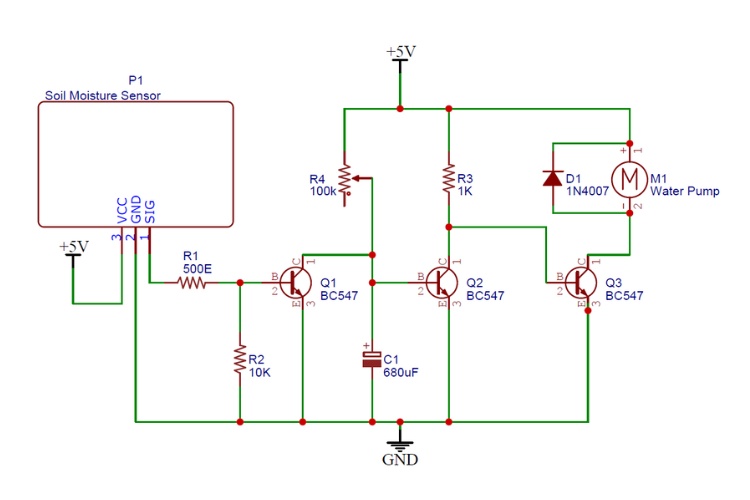
The system relies on a soil moisture sensor to detect soil moisture levels. When the soil is dry, the sensor activates a timer circuit, triggering a mini water pump to deliver water. Once the soil is adequately moist, the pump shuts off, ensuring efficient watering.


Components:

Soil Moisture Sensor

Transistors (BC547)

Electrolytic Capacitor (680uf)

Resistors (10k, 1k, 500E)

Potentiometer (100k Ohm)

Breadboard

Mini Water Pump

Mini Water Tube

5V Power Source


Assembly:

Designed for easy assembly using a breadboard, the system can also be soldered onto a PCB for a permanent solution. It operates on a 5V DC input, compatible with various power sources.


Our automatic plant watering system offers a practical solution for plant care, allowing users to maintain healthy plants with minimal effort. By simplifying the process and removing Arduino, we've made plant care accessible to all enthusiasts, regardless of experience level. Say goodbye to wilted plants and hello to thriving greenery with our straightforward system!