Showing posts with label ArduinoOLEDdisplay. Show all posts

Thursday, 26 March 2026

DIY Arduino Handheld Game Console Using UNO R4 WiFi

Handheld Arduino Game Console

Tired of building the same old Arduino projects like blinking LEDs and basic sensors? Then it’s time to try something more exciting. This DIY handheld Arduino game console transforms your development skills into a fun, interactive experience where you can actually play games on hardware you built yourself.

This compact console is powered by the Arduino UNO R4 WiFi and features a small OLED display, tactile buttons, and a buzzer for sound effects. Despite its simple design, it packs multiple retro-style games, making it perfect for beginners and hobbyists who want to explore both hardware and software in a creative way.About

About This Arduino Game Console

This project is a portable Arduino game console. It includes a 0.96-inch OLED display, four control buttons, and a buzzer, all mounted on a custom HAT-style board. The console runs 10 classic-style games like Snake, Pong, and Tetris, each written separately in modular code files.

Console Highlights

Working of DIY-Handheld-Arduino-Game-Console

The console is designed to be compact and fully portable. Powered by a LiPo battery with a boost converter, it can be used anywhere without external power. The OLED display provides smooth graphics, while the buttons offer simple and responsive controls.

The games included are optimized for the hardware, giving a nostalgic retro gaming feel without heavy processing requirements.

Components Required

DIY-Handheld-Arduino-Game-Console-Hardware-Setup

To build this console, you only need a few essential components: Arduino UNO R4 WiFi, OLED display, push buttons, buzzer, LiPo battery, and a boost converter. These parts are assembled on a perfboard to create a compact and clean design.

Building the Console

All components are mounted on a perfboard designed like a HAT that sits directly on top of the Arduino. This approach keeps the design neat and portable compared to messy breadboard wiring.

Careful wiring and compact placement ensure stability and better usability during gameplay.

Code Structure

The software is written in a modular way where each game is stored in a separate header file. This makes it easy to add or modify games without affecting the entire system.

The main program handles menu navigation, input reading, and launching games based on user selection.

Challenges & Fixes

During development, two main challenges were faced. First, compatibility issues with display libraries were solved by switching to the U8g2 library. Second, button bouncing caused unwanted inputs, which was fixed using software debouncing logic.

Conclusion

This Arduino game console project is a great way to combine creativity with electronics. It goes beyond basic circuits and gives you a real, usable device that you can play with.

Whether you're a beginner or an experienced maker, this project helps you understand embedded systems, display handling, and user interaction in a fun and practical way.

https://circuitdigest.com 

Robotics Projects |Arduino Projects | Raspberry Pi Projects|

Monday, 20 May 2024

Easy Steps to Interface OLED Display With Arduino


Are you tired of the limitations posed by traditional LCD displays in your Arduino projects? Say hello to Arduino OLED displays – the versatile, feature-rich alternative that opens up a world of possibilities for your creations. In this comprehensive guide, we'll delve into everything you need to know about OLED displays and how to seamlessly integrate them with your Arduino projects.


Understanding OLED Displays

OLED (Organic Light Emitting Diode) displays are a game-changer in the realm of visual interfaces. Unlike LCD technology, OLED displays are self-emissive, meaning each individual pixel generates its own light, eliminating the need for a backlight. This not only results in deeper blacks and vibrant colors but also enables thinner and more energy-efficient displays.


Types of OLED Displays

OLED displays come in various sizes, resolutions, and communication protocols, offering flexibility to suit diverse project requirements. The two primary communication protocols used are I2C and SPI, each with its own advantages in terms of speed and complexity.


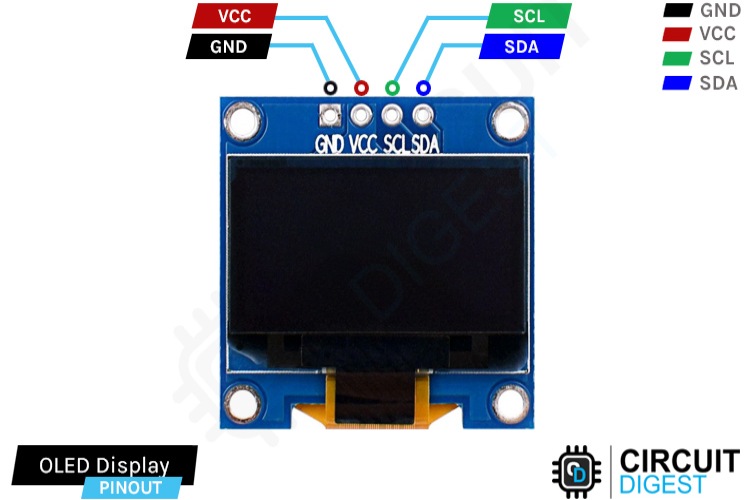
I2C OLED Display Module Pinout:


Ground (GND): Connect to the Arduino's ground pin.

Power (VCC): Provides power to the module (usually connected to the 5V pin).

Serial Clock (SCL): Generates clock pulses for I2C communication.

Serial Data (SDA): Transfers data via I2C communication.


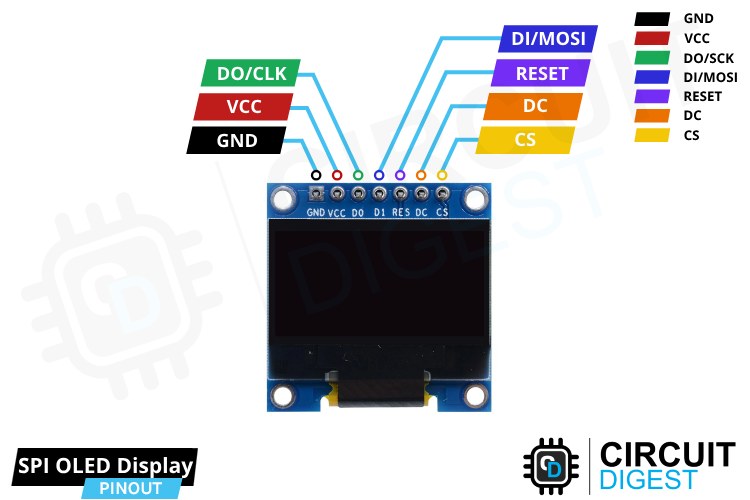
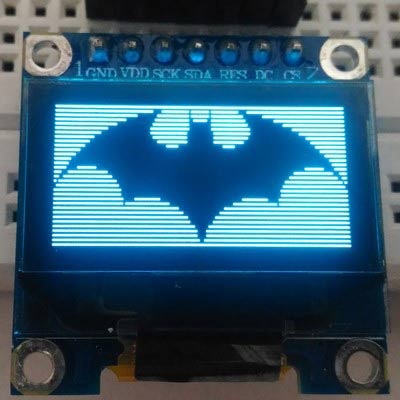
SPI OLED Display Module Pinout:


Ground (GND): Connect to the Arduino's ground pin.

Power (VCC): Provides power to the module (usually connected to the 5V pin).

Serial Clock (D0/CLK): Generates clock pulses for SPI communication.

Serial Data In (D1/MOSI): Sends data to the display.

Reset (RESET): Resets the internal buffer of the display.

Data/Command (DC): Controls the type of data sent to the display.

Chip Select (CS): Selects the display controller.


Interfacing with Arduino

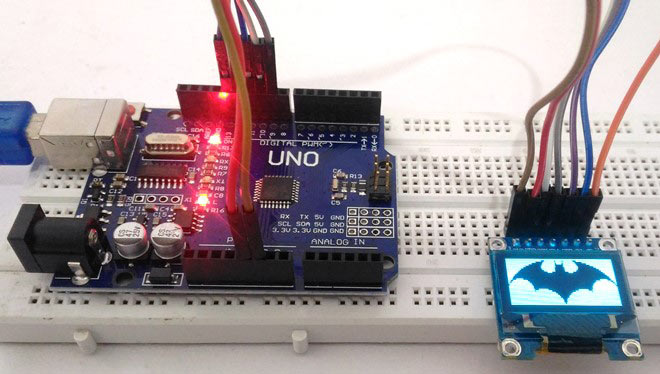
Connecting OLED displays to Arduino boards is straightforward, requiring minimal components and simple wiring. Whether using I2C or SPI interface, the process involves connecting power, ground, and communication pins according to the chosen protocol.


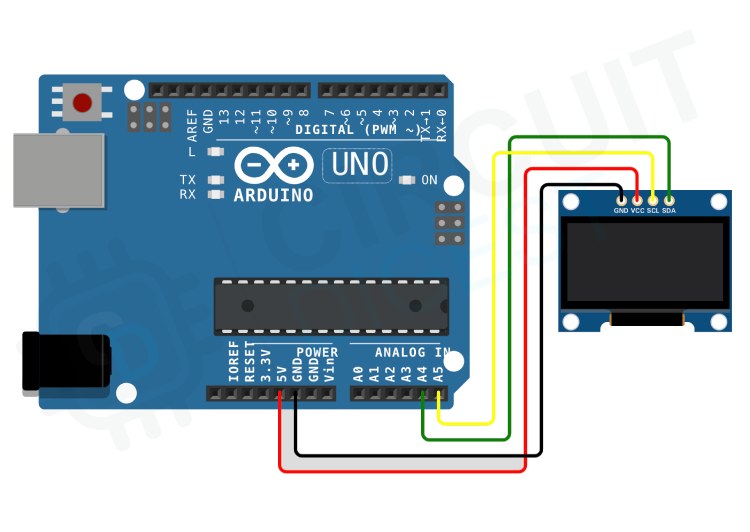
I2C OLED Module Interfacing Connection Diagram:


GND to GND pin

VCC to 5V pin

SCL to A5 pin

SDA to A4 pin


SPI OLED Module Interfacing Connection Diagram:


GND to GND pin

VCC to 5V pin

D0/CLK to digital pin 10

D1/MOSI to digital pin 9

RESET to digital pin 13

DC to digital pin 11

CS to digital pin 12


Programming OLED Displays

Once the hardware connections are established, programming OLED displays with Arduino involves installing the necessary libraries and writing code to control the display content. Whether using I2C or SPI, the Adafruit SSD1306 and Adafruit GFX libraries are essential for interfacing with OLED displays.


Basic Text and Graphics Functions

From displaying text and numbers to drawing shapes and images, OLED displays offer a myriad of possibilities for visual representation. Using functions provided by the Adafruit GFX library, you can manipulate text size, color, and position, as well as draw various shapes with ease.


Troubleshooting and Common Issues

While working with OLED displays, encountering issues is not uncommon. However, by following a systematic troubleshooting approach, you can quickly identify and resolve common problems related to hardware connections, power supply, code errors, and display settings.


In conclusion, OLED displays present a versatile and powerful solution for visual interfaces in Arduino projects. By understanding the different types of OLED displays, mastering their interfacing with Arduino, and leveraging the rich set of programming functions, you can unlock endless possibilities for creativity and innovation in your projects.


Check out our comprehensive video tutorial on integrating OLED displays with Arduino