Showing posts with label Bluetooth. Show all posts

Friday, 1 May 2026

LiteWing ESP32 Drone with Bluetooth Speaker (Flying Loudspeaker Project)

LiteWing ESP32 Drone Loudspeaker with Wireless Audio Announcement

Ever wondered if your drone could do more than just fly? In this build, we take the LiteWing ESP32 drone and turn it into a flying loudspeaker making it ESP32 Drone with bluetooth speaker. By adding a lightweight Bluetooth audio system, the drone can now play voice messages, music, or announcements while in the air - no coding required.

What Makes This Project Interesting

This isn’t just another drone add-on. It’s a simple upgrade that completely changes how the drone can be used. Instead of only capturing visuals or flying around, your drone becomes an aerial communication device.

Think of it like a mini public announcement system in the sky.

And the best part? It works using basic Bluetooth pairing - no complicated programming or firmware changes.

How the System Works

The setup is surprisingly straightforward. The audio flows through a clean chain of components:

  • Your phone connects via Bluetooth
  • The Bluetooth module receives audio
  • The amplifier boosts the signal
  • The speaker plays the sound

All of this happens while the drone continues flying normally.

The flight system and audio system operate independently, so there’s no interference. You can control the drone and stream audio at the same time without lag.

Components Used

Hardware-Connections

The hardware is simple and easy to source:

  • LiteWing ESP32 Drone
  • Bluetooth audio module (JDY-62)
  • PAM8403 audio amplifier
  • 2W 8Ω speaker
  • Boost converter (3.7V to 5V)

Each part plays a specific role - receiving, amplifying, and outputting audio while maintaining stable power.

Hardware Setup (In Simple Terms)

The Bluetooth module connects to the amplifier, and the amplifier drives the speaker. Power is handled by a boost converter to ensure a stable 5V supply.

Everything is powered from the drone’s VBUS pin, which provides enough current for smooth operation.

One important thing here - don’t use the 3.3V pin. It can cause resets because it cannot handle the required load.

Real Experience During Flight

Once everything is connected:

  • Power on the drone
  • Pair your phone via Bluetooth
  • Play audio

That’s it.

You’ll hear the sound coming from the drone while it’s flying. The audio is clear enough for short-range announcements, making it practical for real-world use.

Where You Can Use This

This project opens up a lot of interesting applications:

  • Event announcements
  • Safety alerts in open areas
  • Campus or crowd communication
  • Creative content and experiments
  • Drone-based advertising

It’s also great for demos, exhibitions, or just experimenting with new ideas.

Things to Keep in Mind

Adding hardware to a drone always affects performance slightly, so balance is important.

  • Keep total weight under 25 grams
  • Mount components evenly
  • Use a stable power source
  • Secure wiring properly

A small mistake in weight distribution can affect flight stability.

Why This Build Works Well

What makes this project stand out is its simplicity. There’s no coding, no complex integration, and no heavy processing involved.

It’s just:
Pair → Play → Fly

That’s what makes it beginner-friendly and fun to build.

This LiteWing ESP32 drone upgrade is a great example of how small additions can unlock completely new use cases. With just a few components, you transform a regular drone into a mobile audio platform.

It’s practical, creative, and easy to build.

If you enjoy experimenting with drones, this is one of those projects that feels simple—but delivers something genuinely cool once you see it in action.

https://circuitdigest.com 

Robotics Projects |Arduino Projects | Raspberry Pi Projects|

Tuesday, 14 April 2026

ESP32 Bluetooth Jammer Using Dual NRF24L01 - Understanding 2.4GHz Interference

DIY Bluetooth Jammer Using ESP32 & NRF24L01

Bluetooth is everywhere - headphones, smartwatches, speakers, even IoT devices. But have you ever wondered what actually happens when these signals get disrupted? This project dives into that exact idea by using an ESP32 and two NRF24L01 modules to explore how interference works in the 2.4 GHz spectrum.

This isn’t about breaking things - it’s about understanding wireless communication at a deeper level.

What This Project Is About

At its core, this build demonstrates how wireless signals can be disturbed in a controlled environment. Bluetooth operates in the crowded 2.4 GHz band, constantly hopping between channels to avoid interference. This technique is called Frequency Hopping Spread Spectrum (FHSS).

In this ESP32 Bluetooth Jammer project, instead of following a clean communication pattern, we deliberately generate a lot of noise across those channels. When that happens, Bluetooth devices struggle to maintain a stable connection.

The result? Audio stutters, disconnections, or delayed responses - basically a real-world example of signal interference.

How the System Works

Circuit Diagram of ESP32 Based Bluetooth Jammer

The ESP32 acts as the brain of the system. It controls two NRF24L01 modules, each connected to separate SPI buses (HSPI and VSPI).

Each module rapidly transmits data across different channels in the 2.4 GHz band. When both modules operate together, they create a dense spread of signals across the spectrum.

This fills the “airspace” with RF activity. Bluetooth devices, which rely on clean channels, start losing packets and fail to communicate properly.

In simple terms, it’s like trying to talk in a room where everyone is shouting at the same time.

Why Two NRF24L01 Modules?

Assembled Image of ESP32 Bluetooth Jammer

Using just one module leaves gaps in coverage. It can only transmit on one channel at a time, even if it switches quickly.

Adding a second NRF24L01 changes things significantly:

  • More channels are covered at the same time
  • Signal density increases
  • Fewer “quiet” gaps in the spectrum
  • Better range due to PA and LNA amplification

This dual-module setup makes the interference much more consistent and effective for testing purposes.

Key Concepts You’ll Learn

This project is actually a great learning platform if you’re into wireless systems. You’ll understand:

  • How Bluetooth communication works
  • What FHSS really does behind the scenes
  • Basics of RF interference in the 2.4 GHz band
  • How SPI communication works on ESP32
  • Challenges in real-world IoT communication

It’s one of those builds where you don’t just assemble hardware - you understand the “why” behind it.

Hardware Setup (Simple Overview)

The build itself is quite straightforward:

  • ESP32 as controller
  • Two NRF24L01 PA and LNA modules
  • LiPo battery or power bank
  • LED for status indication
  • Switch for power control

The important part here is stable power. These RF modules draw bursts of current, so proper decoupling and a good power source are critical.

What You’ll Observe

Once everything is running, you can test it with a simple setup - like playing music over Bluetooth.

Initially, everything works fine. But the moment you turn on the system, you’ll notice:

  • Audio drops or stutters
  • Devices disconnecting
  • Increased latency

That’s interference in action.

Important Note: This project is strictly for educational and experimental purposes. It helps you understand how wireless communication behaves under noisy conditions.

This ESP32-based project is a hands-on way to explore how wireless systems actually behave in real-world conditions. Instead of just reading theory, you get to see how signals interact, collide, and fail.

If you’re into IoT, RF communication, or embedded systems, this project gives you a deeper understanding of something we use every day - but rarely think about.

https://circuitdigest.com 

Robotics Projects |Arduino Projects | Raspberry Pi Projects|

Tuesday, 27 May 2025

Build a Gesture-Controlled Drone Using ESP32 and MPU6050


Ever thought of flying a drone with just your hand gestures? In DIY Gesture Control Drone, we’ll walk you through building a gesture-controlled LiteWing drone using ESP32 and MPU6050. It’s affordable, beginner-friendly, and works using Python and Bluetooth. Whether you're a hobbyist or student, you’ll find the step-by-step tutorial easy to follow and fun to build

Hand Gesture Control esp32 mpu6050

Components Required for Drone Gesture Control Project

  • LiteWing Drone with battery 
  • VLX5311x ToF Sensor For height hold 
  • ESP32 dev module and mpu6050 for gesture control 
  • A computer with python installed
Features of Gesture Control Drone DIY Project 
  • Gesture Control
  • Wireless Communication
  • Stable Flying
  • Compact and Lightweight
Gesture CFLib python Litewing


How Gesture Control Works?
Gesture control refers to using, hand movements to operate devices without  physical contact. An MPU6050 sensor detects the tilt and motion of your hand, which is processed by an ESP32 microcontroller. These movements are then sent via Bluetooth, allowing you to fly the drone without a traditional remote. you can get full dettails on our tutorial on ESP32 Air Mouse.

For the complete tutorial, schematics and python code : DIY Gesture Control Drone using Python with LiteWing and ESP32

Thursday, 14 January 2016

Bluetooth Controlled Robot using Arduino


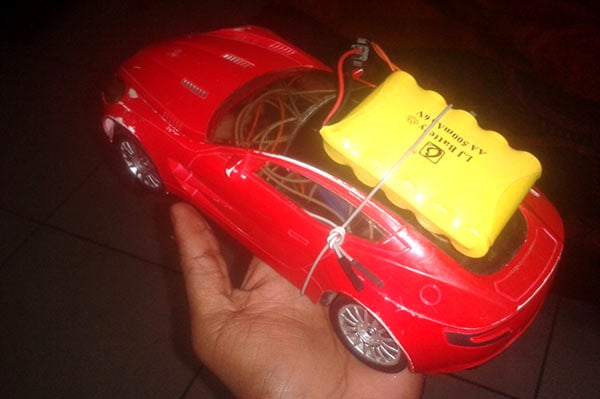
This is an interesting project where we have used a toy car to control it through the bluetooth of your cell phone. We have used the arduino board in this project.

In fact Bluetooth controlled car is controlled by using Android mobile phone instead of any other method like buttons, gesture etc. Here only needs to touch button in android phone to control the car in forward, backwardd, left and right directions. So here android phone is used as transmitting device and Bluetooth module placed in car is used as receiver. Android phone will transmit command using its in-built Bluetooth to car so that it can move in the required direction like moving forward, reverse, turning left, turning right and stop.

Check here the full project with circuit diagram and code: Bluetooth Controlled Robot using Arduino