Showing posts with label TechInnovation. Show all posts

Tuesday, 28 May 2024

Understanding Gas Sensors: Types, Construction, and Applications


The human nose can detect about 1 trillion different odors, but identifying specific gas types or concentrations in the atmosphere requires specialized sensors. Gas sensors are essential for detecting toxic gasses to maintain safety and prevent hazards. These sensors are used to detect gasses like oxygen, carbon dioxide, nitrogen, and methane, commonly found in air quality monitoring devices and gas leak detectors.


What is a Gas Sensor?

A gas sensor detects the presence or concentration of gasses in the atmosphere. It produces a corresponding potential difference by changing the resistance of the material inside the sensor, measured as output voltage. This voltage helps estimate the type and concentration of the gas.

Types of Gas Sensors


1. Semiconductor / Metal Oxide-Based Gas Sensors:


Detect changes in resistance of a semiconductor material (e.g., tin dioxide) when exposed to gases. These sensors are sensitive and inexpensive but require regular calibration and are affected by temperature and humidity.


2. Electrochemical Gas Sensors:


Measure gas concentrations through oxidation or reduction at an electrode, generating a current proportional to the gas concentration. They are accurate and specific but can be poisoned by other gases and have a limited lifespan.


3. Non-Dispersive Infrared (NDIR) Gas Sensors:


Measure gas concentration based on infrared absorption. They are highly accurate and durable but more expensive and limited to detecting gases that absorb infrared light.


4. Catalytic Gas Sensors:


Use a catalytic bead that changes resistance when it oxidizes flammable gases. They are effective at low gas concentrations but require oxygen and can be poisoned by certain chemicals.


5. Photoionisation Detectors (PIDs):


Use UV light to ionize gases, measuring the current generated by these ions. They are sensitive to volatile organic compounds but have high lamp replacement costs and environmental sensitivity.


6. Thermal Conductivity Gas Sensors:


Assess changes in thermal conductivity caused by different gases. They are simple and durable but have lower sensitivity and are influenced by ambient temperature.


7. Gas Chromatograph Analyzers:


Separate and measure components of a gas mixture. They are highly accurate but expensive and require skilled operation.


8. Capacitance-Based Gas Sensors:


Detect changes in capacitance due to gas absorption on the sensor's coating. They are sensitive to humidity but require careful calibration.


9. Acoustic-Based Gas Sensors:


Measure changes in acoustic properties caused by gas presence. They are quick and non-invasive but require frequent calibration.


10. Calorimetric Gas Sensors:


Measure heat change from a chemical reaction with the target gas. They are specific but generally slower in response.


11. Magnetic Gas Sensors:


Leverage magnetic properties of certain gasses to gauge concentration. They are stable and unaffected by interference gasses but limited to paramagnetic gasses.


Semiconductor / Metal Oxide-Based Gas Sensor Construction


These sensors consist of:


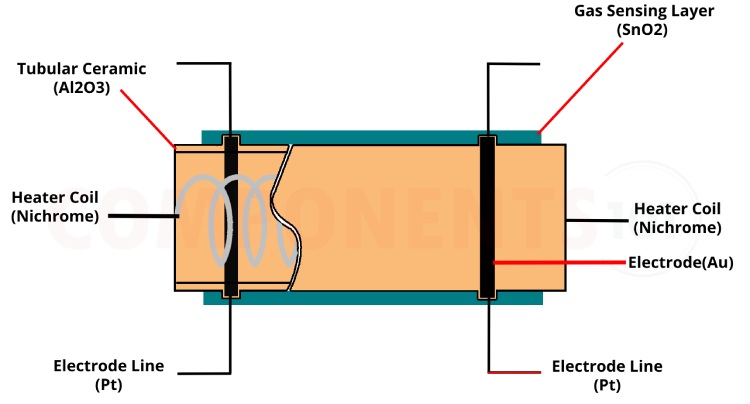
Gas Sensing Layer: Detects gas concentration changes.

Heater Coil: Preheats the sensing element for increased sensitivity.

Electrode Line: Conducts small currents generated by the sensing layer.

Electrode: Connects the sensing layer to the electrode line.

Tubular Ceramic: Maintains preheating of the sensing layer.

Mesh: Protects the sensing elements from dust and corrosive particles.

Working Principle

These sensors use a chemiresistor, typically Tin Dioxide (SnO2), an n-type semiconductor. In clean air, oxygen attracts free electrons from SnO2, preventing current flow. When exposed to combustible gasses, these gasses react with the adsorbed oxygen, freeing the electrons and allowing current to flow, proportional to the gas concentration.


Using a Gas Sensor

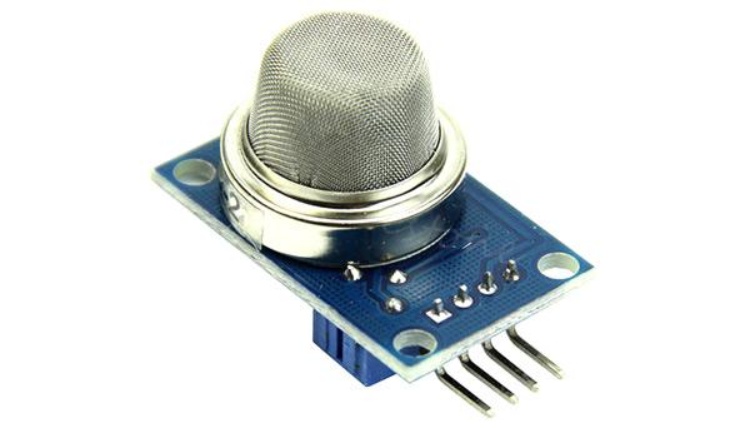
A typical gas sensor has six terminals: four for input/output (A, A, B, B) and two for the heater coil (H, H). Modules often include additional components like a comparator (LM393) and an adjustable potentiometer for setting the gas concentration threshold. The module has four pins: Vcc (power supply), GND (ground), Digital output (high/low signal), and Analog output (continuous voltage signal).


Popular Gas Sensors

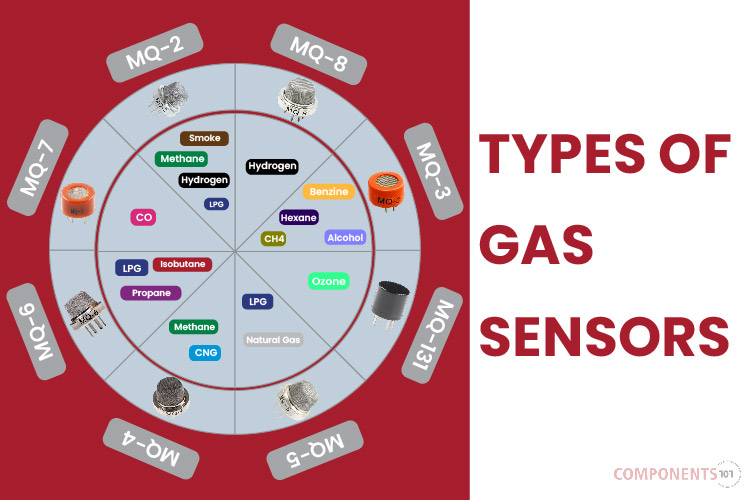
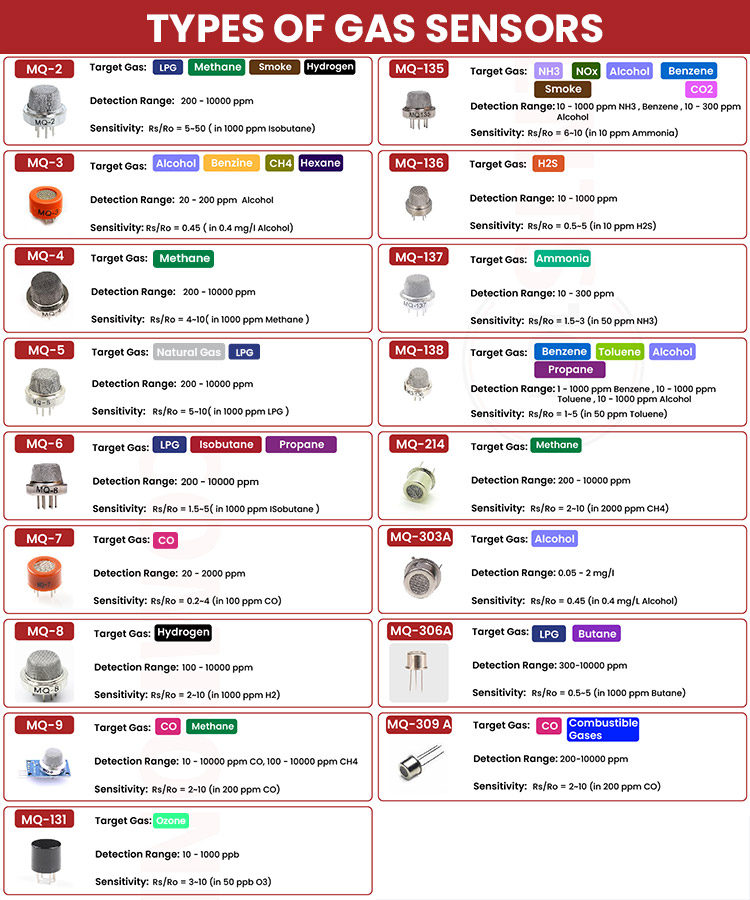
Popular semiconductor gas sensors include MQ-2, MQ-3, MQ-4, MQ-5, MQ-6, MQ-7, MQ-8, MQ-9, MQ-131, MQ-135, and MQ-136. These sensors are widely used for their reliability and sensitivity.

Applications

  • Industrial Monitoring: Detecting toxic gas concentrations.

  • Household Safety: Detecting gas leaks.

  • Oil Rigs: Monitoring released gases.

  • Hotels: Preventing smoking in non-smoking areas.

  • Offices: Monitoring air quality.

  • Air Conditioners: Checking CO2 levels.

  • Fire Detection: Identifying combustible gases.

  • Mining: Ensuring miner safety.

  • Breath Analyzers: Measuring alcohol content.


Gas sensors are crucial for safety and air quality monitoring across various environments. Understanding their types, construction, and working principles helps in choosing the right sensor for specific applications.

Monday, 20 May 2024

Easy Steps to Interface OLED Display With Arduino


Are you tired of the limitations posed by traditional LCD displays in your Arduino projects? Say hello to Arduino OLED displays – the versatile, feature-rich alternative that opens up a world of possibilities for your creations. In this comprehensive guide, we'll delve into everything you need to know about OLED displays and how to seamlessly integrate them with your Arduino projects.


Understanding OLED Displays

OLED (Organic Light Emitting Diode) displays are a game-changer in the realm of visual interfaces. Unlike LCD technology, OLED displays are self-emissive, meaning each individual pixel generates its own light, eliminating the need for a backlight. This not only results in deeper blacks and vibrant colors but also enables thinner and more energy-efficient displays.


Types of OLED Displays

OLED displays come in various sizes, resolutions, and communication protocols, offering flexibility to suit diverse project requirements. The two primary communication protocols used are I2C and SPI, each with its own advantages in terms of speed and complexity.


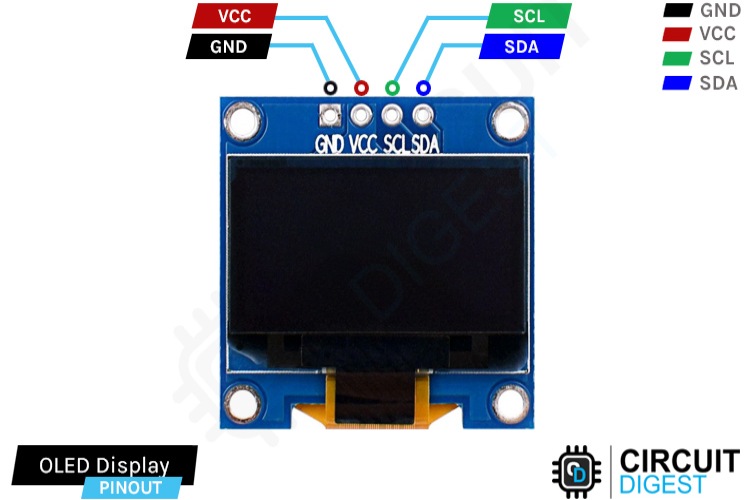
I2C OLED Display Module Pinout:


Ground (GND): Connect to the Arduino's ground pin.

Power (VCC): Provides power to the module (usually connected to the 5V pin).

Serial Clock (SCL): Generates clock pulses for I2C communication.

Serial Data (SDA): Transfers data via I2C communication.


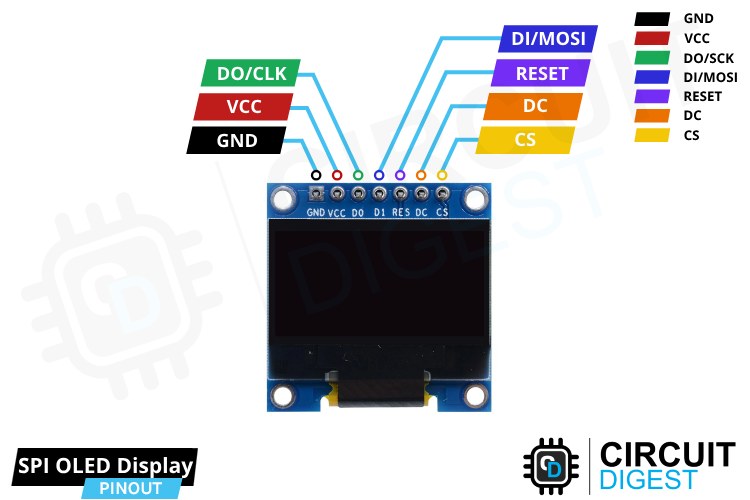
SPI OLED Display Module Pinout:


Ground (GND): Connect to the Arduino's ground pin.

Power (VCC): Provides power to the module (usually connected to the 5V pin).

Serial Clock (D0/CLK): Generates clock pulses for SPI communication.

Serial Data In (D1/MOSI): Sends data to the display.

Reset (RESET): Resets the internal buffer of the display.

Data/Command (DC): Controls the type of data sent to the display.

Chip Select (CS): Selects the display controller.


Interfacing with Arduino

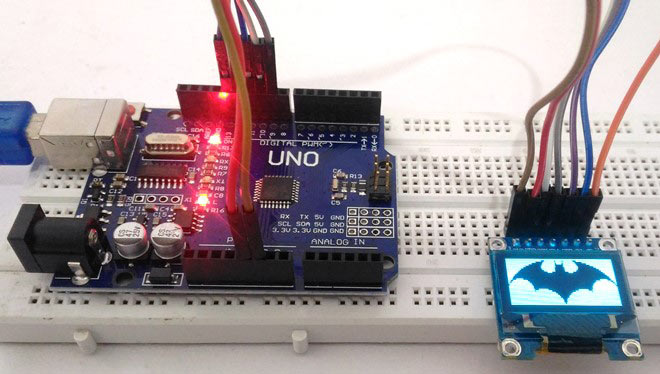
Connecting OLED displays to Arduino boards is straightforward, requiring minimal components and simple wiring. Whether using I2C or SPI interface, the process involves connecting power, ground, and communication pins according to the chosen protocol.


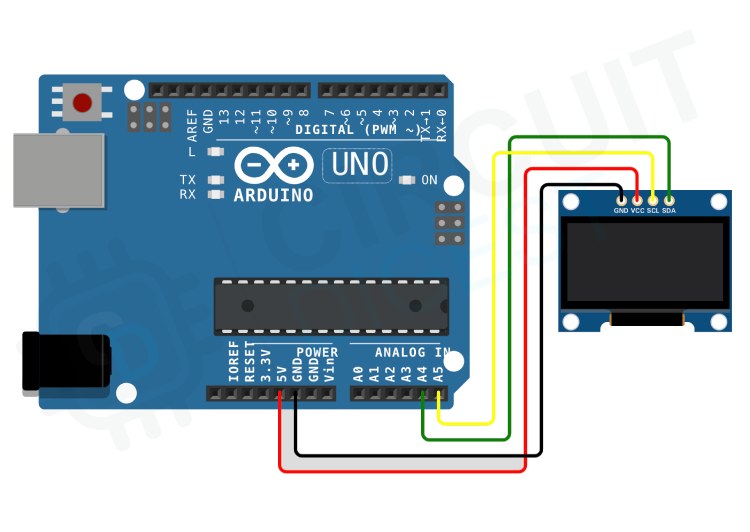
I2C OLED Module Interfacing Connection Diagram:


GND to GND pin

VCC to 5V pin

SCL to A5 pin

SDA to A4 pin


SPI OLED Module Interfacing Connection Diagram:


GND to GND pin

VCC to 5V pin

D0/CLK to digital pin 10

D1/MOSI to digital pin 9

RESET to digital pin 13

DC to digital pin 11

CS to digital pin 12


Programming OLED Displays

Once the hardware connections are established, programming OLED displays with Arduino involves installing the necessary libraries and writing code to control the display content. Whether using I2C or SPI, the Adafruit SSD1306 and Adafruit GFX libraries are essential for interfacing with OLED displays.


Basic Text and Graphics Functions

From displaying text and numbers to drawing shapes and images, OLED displays offer a myriad of possibilities for visual representation. Using functions provided by the Adafruit GFX library, you can manipulate text size, color, and position, as well as draw various shapes with ease.


Troubleshooting and Common Issues

While working with OLED displays, encountering issues is not uncommon. However, by following a systematic troubleshooting approach, you can quickly identify and resolve common problems related to hardware connections, power supply, code errors, and display settings.


In conclusion, OLED displays present a versatile and powerful solution for visual interfaces in Arduino projects. By understanding the different types of OLED displays, mastering their interfacing with Arduino, and leveraging the rich set of programming functions, you can unlock endless possibilities for creativity and innovation in your projects.


Check out our comprehensive video tutorial on integrating OLED displays with Arduino


Friday, 17 May 2024

Design Tips and Troubleshooting Guide for MCP2200 Protocol Converter

 The MCP2200, developed by Microchip Technology, serves as a USB-to-UART serial converter, facilitating the conversion of USB connections to serial interfaces.


Design Considerations


  • Ensure proper connectivity and voltage levels between the MCP2200 and connected devices.

  • Strategic placement of the USB port close to the IC for efficient data transfer.

  • Direct routing of data lines and minimal use of vias to reduce signal interference.

  • Include filter capacitors and maintain tight component arrangement to optimize performance.


Troubleshooting Tips


  • Verify signal connections and check voltage compatibility to address communication failures.

  • Test functionality by matching serial settings with connected devices and performing a loopback test for data transmission.

  • Use alternative USB cables to rule out potential cable issues.


Microcontroller programming, debugging, industrial control systems, DIY electronics projects, legacy device support, automation, and robotics. Alternatives include CH340, MA112AS16, FT230x, CP2102, PL2303HX, CH9102, CH343, CH341, CP2110, and FT232.


Detailed mechanical drawings and dimensions aid in creating custom footprints for PCB or CAD modeling, ensuring accurate integration of the MCP2200 into electronic designs. For detailed technical specifications and mechanical drawings, refer to the MCP2200 datasheet available here.


Tuesday, 14 May 2024

Exploring the CH9102 USB to Serial Converter: Design and Troubleshooting

 The CH9102 stands out as a robust USB to serial UART converter, engineered by WCH (Nanjing QinHeng Corp), widely adopted in USB-to-serial adapter cables and development boards. This article delves into its design aspects and offers troubleshooting insights for smoother integration into projects.


Troubleshooting Tips:


  • Verify Connections: Double-check all connections to ensure they are properly made between the CH9102 and other components of the circuit.

  • Check Signal Voltage Compatibility: Ensure that the voltage levels of the signals (TX, RX, etc.) are compatible with the devices you are connecting to.

  • Test Serial Settings: Align serial settings, such as baud rate, between your computer and the device you are communicating with to ensure compatibility.

  • Conduct Loopback Test: Perform a loopback test by connecting the TX and RX pins of the CH9102. Send data from your computer, and if it is received correctly, it indicates that the CH9102 is functioning properly.

  • Address Computer Recognition Issues: Install correct drivers for the CH9102 chip on your computer. Check for hardware connection problems in the Device Manager, ensuring the chip is recognized without any error messages.


Design Considerations:


  • Strategic USB Port Placement: Place the USB port near the CH9102 IC on the PCB layout to minimize signal interference and optimize data transfer.

  • Direct Routing of Data Lines: Route data lines directly to reduce signal degradation and improve overall signal integrity.

  • Minimal Via Count: Minimize the number of vias in data lines to avoid signal loss and maintain signal integrity.

  • Inclusion of Filter Capacitors: Incorporate filter capacitors to stabilize voltage and reduce noise, enhancing the performance of the CH9102 and surrounding components.

  • Comprehensive Component Arrangement: Arrange components strategically to optimize space utilization and ensure efficient heat dissipation, contributing to the stability and reliability of the overall system.


Applications:

The CH9102 finds versatile applications in microcontroller programming, industrial control systems, DIY electronics projects, and legacy device support. Its adaptability extends to USB to RS485, RS232, and TTL serial port conversions, making it indispensable across various domains. 

Alternatives to CH9102 include CP2102, CP2104, CH340, MA112AS16, FT230x, PL2303HX, CH341, CH343, MCP2200, CP2110, and FT232.


As a cornerstone in USB connectivity solutions, the CH9102 offers reliability and efficiency. Understanding its design intricacies and troubleshooting methods ensures optimal performance in diverse project scenarios, making it a preferred choice for engineers and enthusiasts alike. For detailed technical specifications and mechanical drawings, refer to the CH9102 datasheet available here.


Sunday, 12 May 2024

Advanced Arduino Project Exploration for Engineering Students

Are you an engineering student keen on practical electronics and embedded systems? Let's delve into a range of fascinating Arduino projects that will boost your skills and understanding of microcontroller applications.


1. DIY Arduino Bluetooth Car Controlled by Mobile Application

Have you ever wanted to create your own remote-controlled robot car? This project will teach you how to build a Bluetooth-controlled car that you can maneuver wirelessly using a mobile app. It's a fantastic gateway into the world of remote-controlled robotics and IoT.


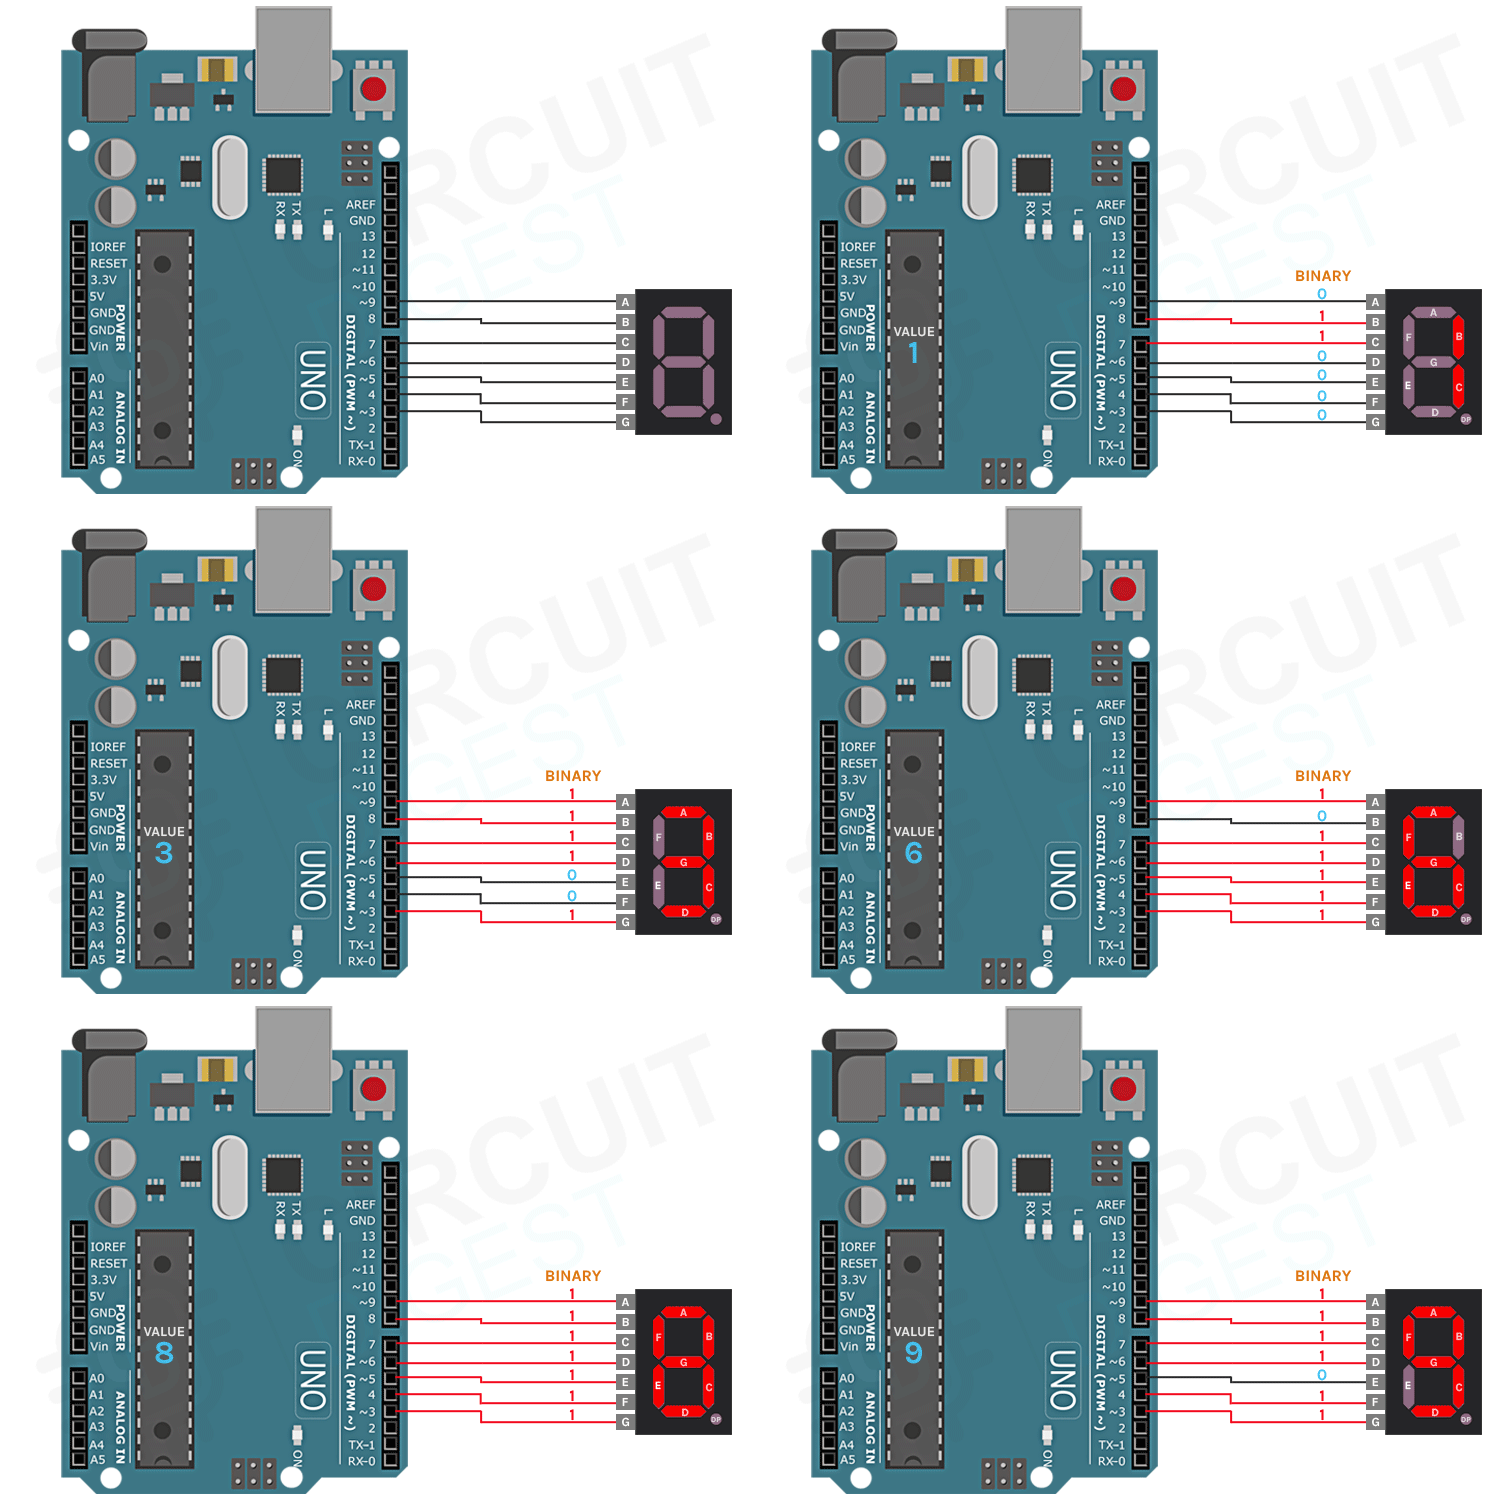
2. Interfacing Seven Segment Display with Arduino

If you're new to electronics, learning how to connect and control a seven-segment display with Arduino is a great starting point. This project lays the foundation for understanding basic electronics and display technologies, which are useful in a wide range of digital applications.


3. Building your own Sun Tracking Solar Panel using an Arduino

Imagine a solar panel that automatically adjusts its position to maximize sunlight exposure throughout the day. With Arduino, you can create your own sun-tracking system that optimizes solar energy efficiency. It's a fascinating project for renewable energy enthusiasts.


4. Programming ESP32 using Arduino Labs for MicroPython

Looking to delve into MicroPython programming with the powerful ESP32 microcontroller? This project combines the versatility of ESP32 with the simplicity of MicroPython, making it ideal for various IoT and wireless communication applications.


5. Arduino-based Hourglass using Accelerometer and LED Matrix Displays

Transform the concept of a traditional hourglass into a modern marvel using Arduino, accelerometer sensors, and LED matrix displays. This unique project showcases the creative integration of sensors and visual displays in timekeeping devices.


6. DIY Motorized Solder Paste Dispenser for Automatic Solder Paste Application

Streamline your soldering tasks with a DIY motorized solder paste dispenser powered by an ATmega328 microcontroller. This project is essential for electronics enthusiasts engaged in manufacturing and prototyping.


7. Build a Battery Internal Resistance Meter with Arduino and Atmel ATtiny85 IC

Ensure optimal performance and longevity of batteries with a homemade internal resistance meter using Arduino and Atmel ATtiny85 IC. It's a handy tool for testing and maintaining batteries in portable electronic devices.


8. DIY Digital Distance Measuring Wheel using Rotary Encoder

Create your own digital distance measuring wheel using Arduino and a rotary encoder. This project is perfect for applications requiring precise distance measurements in robotics, surveying, or DIY projects.


9. Laser Engraving with DIY Arduino SCARA Robot

Explore the art of laser engraving by building a SCARA (Selective Compliance Assembly Robot Arm) robot powered by Arduino. This project merges precision robotics with laser technology, offering advanced prototyping possibilities.


10. Earthquake Indicator Using Arduino

Develop an earthquake indicator system using Arduino for real-time monitoring and detection of seismic activities. This project is invaluable for disaster preparedness and showcases Arduino's versatility in sensor applications.


These Arduino projects offer a comprehensive exploration of electronics, robotics, and IoT applications. Whether you're a beginner or an experienced engineer, each project provides valuable hands-on experience and opens doors to endless possibilities in the world of embedded systems and automation.


Get ready to unleash your creativity and engineering skills with these fascinating Arduino projects!