Showing posts with label STEMEducation. Show all posts

Monday, 20 May 2024

Easy Steps to Interface OLED Display With Arduino


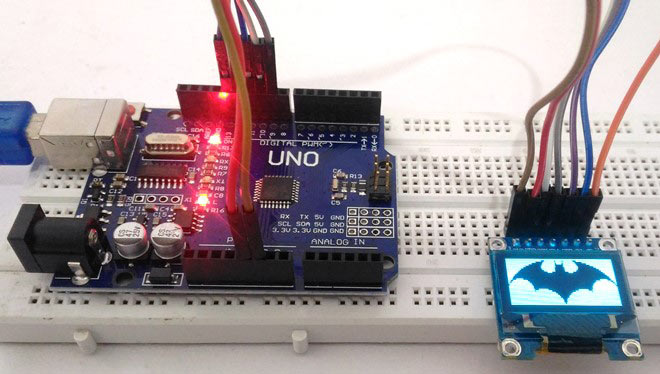
Are you tired of the limitations posed by traditional LCD displays in your Arduino projects? Say hello to Arduino OLED displays – the versatile, feature-rich alternative that opens up a world of possibilities for your creations. In this comprehensive guide, we'll delve into everything you need to know about OLED displays and how to seamlessly integrate them with your Arduino projects.


Understanding OLED Displays

OLED (Organic Light Emitting Diode) displays are a game-changer in the realm of visual interfaces. Unlike LCD technology, OLED displays are self-emissive, meaning each individual pixel generates its own light, eliminating the need for a backlight. This not only results in deeper blacks and vibrant colors but also enables thinner and more energy-efficient displays.


Types of OLED Displays

OLED displays come in various sizes, resolutions, and communication protocols, offering flexibility to suit diverse project requirements. The two primary communication protocols used are I2C and SPI, each with its own advantages in terms of speed and complexity.


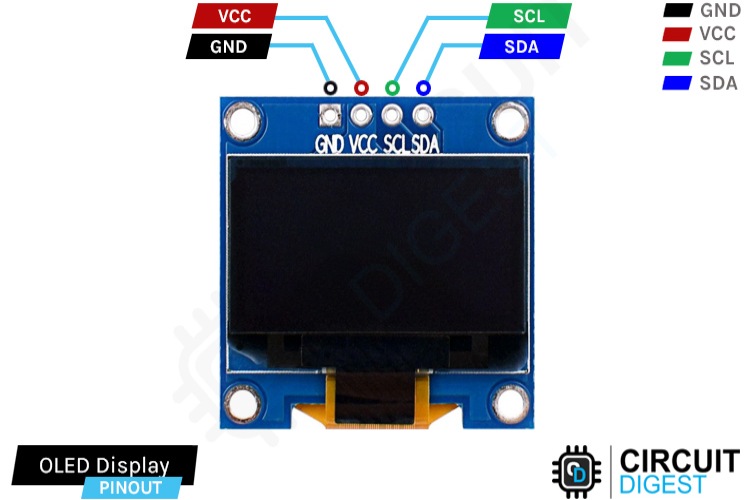
I2C OLED Display Module Pinout:


Ground (GND): Connect to the Arduino's ground pin.

Power (VCC): Provides power to the module (usually connected to the 5V pin).

Serial Clock (SCL): Generates clock pulses for I2C communication.

Serial Data (SDA): Transfers data via I2C communication.

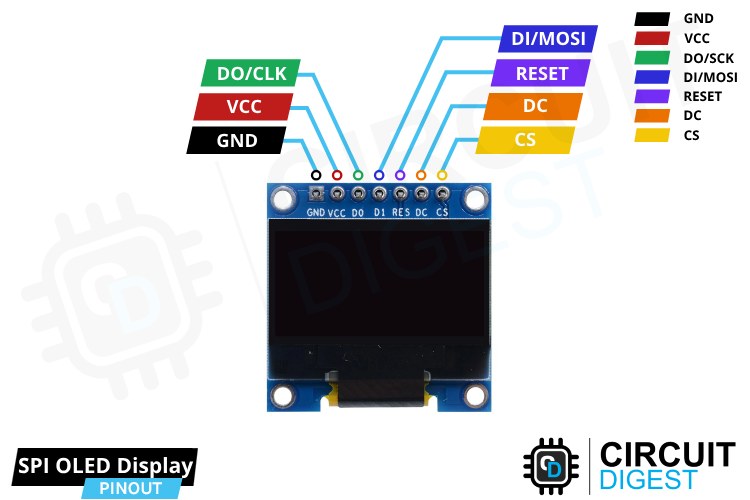
SPI OLED Display Module Pinout:


Ground (GND): Connect to the Arduino's ground pin.

Power (VCC): Provides power to the module (usually connected to the 5V pin).

Serial Clock (D0/CLK): Generates clock pulses for SPI communication.

Serial Data In (D1/MOSI): Sends data to the display.

Reset (RESET): Resets the internal buffer of the display.

Data/Command (DC): Controls the type of data sent to the display.

Chip Select (CS): Selects the display controller.

Interfacing with Arduino

Connecting OLED displays to Arduino boards is straightforward, requiring minimal components and simple wiring. Whether using I2C or SPI interface, the process involves connecting power, ground, and communication pins according to the chosen protocol.


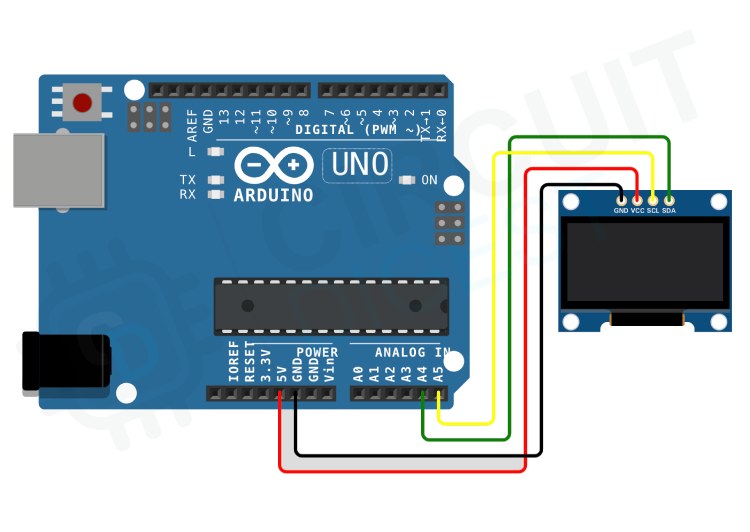
I2C OLED Module Interfacing Connection Diagram:


GND to GND pin

VCC to 5V pin

SCL to A5 pin

SDA to A4 pin

SPI OLED Module Interfacing Connection Diagram:


GND to GND pin

VCC to 5V pin

D0/CLK to digital pin 10

D1/MOSI to digital pin 9

RESET to digital pin 13

DC to digital pin 11

CS to digital pin 12


Programming OLED Displays

Once the hardware connections are established, programming OLED displays with Arduino involves installing the necessary libraries and writing code to control the display content. Whether using I2C or SPI, the Adafruit SSD1306 and Adafruit GFX libraries are essential for interfacing with OLED displays.


Basic Text and Graphics Functions

From displaying text and numbers to drawing shapes and images, OLED displays offer a myriad of possibilities for visual representation. Using functions provided by the Adafruit GFX library, you can manipulate text size, color, and position, as well as draw various shapes with ease.


Troubleshooting and Common Issues

While working with OLED displays, encountering issues is not uncommon. However, by following a systematic troubleshooting approach, you can quickly identify and resolve common problems related to hardware connections, power supply, code errors, and display settings.
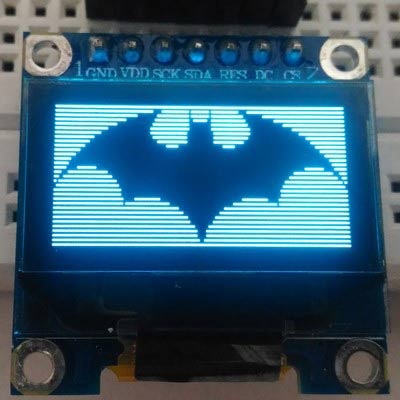


In conclusion, OLED displays present a versatile and powerful solution for visual interfaces in Arduino projects. By understanding the different types of OLED displays, mastering their interfacing with Arduino, and leveraging the rich set of programming functions, you can unlock endless possibilities for creativity and innovation in your projects.


Check out our comprehensive video tutorial on integrating OLED displays with Arduino


Sunday, 12 May 2024

Advanced Arduino Project Exploration for Engineering Students

Are you an engineering student keen on practical electronics and embedded systems? Let's delve into a range of fascinating Arduino projects that will boost your skills and understanding of microcontroller applications.


1. DIY Arduino Bluetooth Car Controlled by Mobile Application

Have you ever wanted to create your own remote-controlled robot car? This project will teach you how to build a Bluetooth-controlled car that you can maneuver wirelessly using a mobile app. It's a fantastic gateway into the world of remote-controlled robotics and IoT.


2. Interfacing Seven Segment Display with Arduino

If you're new to electronics, learning how to connect and control a seven-segment display with Arduino is a great starting point. This project lays the foundation for understanding basic electronics and display technologies, which are useful in a wide range of digital applications.


3. Building your own Sun Tracking Solar Panel using an Arduino

Imagine a solar panel that automatically adjusts its position to maximize sunlight exposure throughout the day. With Arduino, you can create your own sun-tracking system that optimizes solar energy efficiency. It's a fascinating project for renewable energy enthusiasts.


4. Programming ESP32 using Arduino Labs for MicroPython

Looking to delve into MicroPython programming with the powerful ESP32 microcontroller? This project combines the versatility of ESP32 with the simplicity of MicroPython, making it ideal for various IoT and wireless communication applications.


5. Arduino-based Hourglass using Accelerometer and LED Matrix Displays

Transform the concept of a traditional hourglass into a modern marvel using Arduino, accelerometer sensors, and LED matrix displays. This unique project showcases the creative integration of sensors and visual displays in timekeeping devices.


6. DIY Motorized Solder Paste Dispenser for Automatic Solder Paste Application

Streamline your soldering tasks with a DIY motorized solder paste dispenser powered by an ATmega328 microcontroller. This project is essential for electronics enthusiasts engaged in manufacturing and prototyping.


7. Build a Battery Internal Resistance Meter with Arduino and Atmel ATtiny85 IC

Ensure optimal performance and longevity of batteries with a homemade internal resistance meter using Arduino and Atmel ATtiny85 IC. It's a handy tool for testing and maintaining batteries in portable electronic devices.


8. DIY Digital Distance Measuring Wheel using Rotary Encoder

Create your own digital distance measuring wheel using Arduino and a rotary encoder. This project is perfect for applications requiring precise distance measurements in robotics, surveying, or DIY projects.


9. Laser Engraving with DIY Arduino SCARA Robot

Explore the art of laser engraving by building a SCARA (Selective Compliance Assembly Robot Arm) robot powered by Arduino. This project merges precision robotics with laser technology, offering advanced prototyping possibilities.


10. Earthquake Indicator Using Arduino

Develop an earthquake indicator system using Arduino for real-time monitoring and detection of seismic activities. This project is invaluable for disaster preparedness and showcases Arduino's versatility in sensor applications.


These Arduino projects offer a comprehensive exploration of electronics, robotics, and IoT applications. Whether you're a beginner or an experienced engineer, each project provides valuable hands-on experience and opens doors to endless possibilities in the world of embedded systems and automation.


Get ready to unleash your creativity and engineering skills with these fascinating Arduino projects!