Learn how to build an RFID-based door lock system using an Arduino Uno, an RFID module, and a servo motor. The system scans an RFID card, checks its ID, and unlocks the door if it’s authorized. This setup is useful for home security, office access control, and smart automation projects.
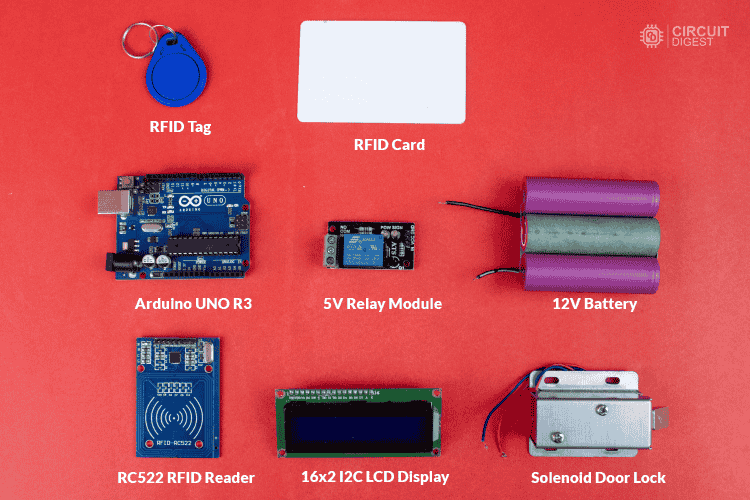
Components Required
- Arduino Uno (or compatible board)
- RC522 RFID Module (to read RFID tags)
- RFID Cards & Key Fobs (for authentication)
- Servo Motor (to control the lock)
- Buzzer & LED Indicators (for access feedback)
- Jumper Wires & Breadboard (for connections)
RFID Door Lock System using Arduino Circuit Diagram
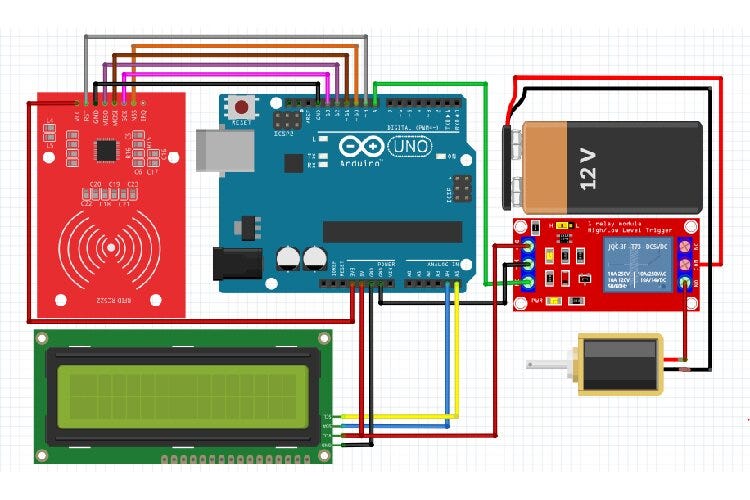
The RFID door lock system works by scanning an RFID card or key fob using the RC522 RFID module. When a card is scanned, the Arduino reads its unique ID and checks if it matches a pre-stored authorized ID. If the card is recognized, the servo motor unlocks the door, allowing access. If the card is not authorized, the system triggers a buzzer and an LED indicator to signal access denial. After a short delay, the lock resets and waits for the next scan, ensuring continuous operation.
Arduino Code to Read RFID Card UID
To find your authorized RFID card UID, compile and upload the code to your Arduino. No hardware modifications are needed.
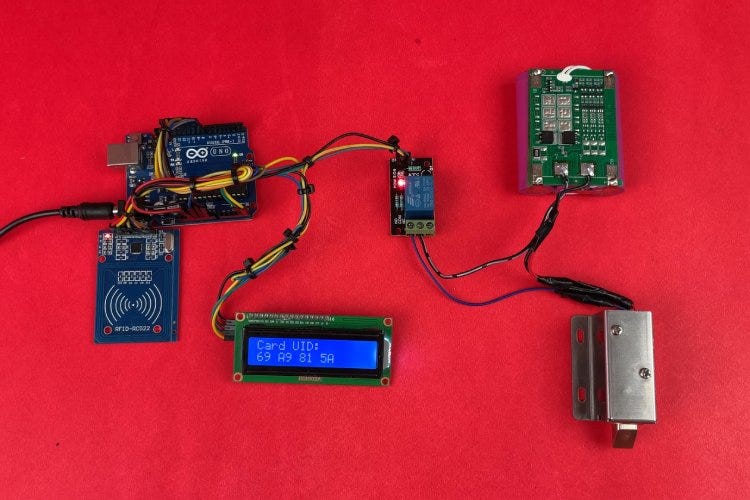
Code for RFID Door Lock System using Arduino
This Arduino-based RFID door lock system reads an RFID card’s UID, checks it against a predefined UID, and unlocks the door for 10 seconds using a relay and solenoid lock while displaying the status on an LCD.
Step-by-Step Guide
Step 1: Setting Up the Hardware
Start by assembling the required components. Connect the RC522 RFID module to the Arduino Uno using SPI communication. Attach the relay module and solenoid lock for door control, and connect the LCD display to show access status. Ensure the power supply is stable for reliable operation.
Step 2: Uploading the UID Retrieval Code
To get the unique ID (UID) of your RFID card, compile and upload the UID retrieval code to the Arduino. This step doesn’t require any hardware modifications. Once uploaded, open the Serial Monitor in the Arduino IDE to view the scanned UID.
Step 3: Storing the Authorized UID
After retrieving the UID, update the main code by replacing the default UID with your card’s UID. This ensures that only the authorized card can unlock the door. Save and re-upload the modified code to the Arduino.
Step 4: Implementing the Door Lock System
The main program continuously scans for RFID cards. When a card is detected, the Arduino checks if its UID matches the stored UID. If authorized, the relay activates the solenoid lock, unlocking the door for 10 seconds. Meanwhile, the LCD display updates the door status.
Step 5: Testing and Final Adjustments
Test the system by scanning different RFID cards. If unauthorized, the lock remains closed, and the system displays an access denied message. Adjust the servo angles, delay timings, or security features as needed for better performance.

Enhancements & Customization
- Store multiple RFID card IDs for multi-user access.
- Add an OLED display to show authentication messages.
- Integrate Wi-Fi or Bluetooth for remote access control.
- Connect to a database for logging entry records.
This RFID-based door lock system offers a simple yet effective way to manage access control. It can be expanded with additional features to enhance security and functionality.
Robotics Projects |Arduino Projects | Raspberry Pi Projects|
ESP32 Projects | AI Projects | IoT Projects | Drone projects | Electronic Circuits | Electronics Projects