Wednesday, 30 July 2025

Static IP on Raspberry Pi Made Simple


How to Set a Static IP on Raspberry Pi

When working with Raspberry Pi on local networks, the device’s IP address can often change after every reboot or network change. This creates problems while accessing your Pi remotely or connecting it to services. To solve this, assigning a Static IP address ensures your Pi always stays at the same address on your network.

In this guide, you'll learn how to configure a static IP on Raspberry Pi OS using a simple configuration file method. This is useful for IoT projects, web servers, or remote SSH access, where a consistent IP is required.

Steps to Set a Static IP

  • Check your current IP using hostname -I
  • Edit the DHCP configuration:
  • Use sudo nano /etc/dhcpcd.conf
  • Add static IP settings
  • Save and reboot using sudo reboot

Why Use a Static IP on Raspberry Pi?

  • Easy remote access via SSH or VNC
  • Ensures consistent device identification in home automation
  • Helps when assigning port forwarding on your router
  • Ideal for Raspberry Pi running servers or cloud services

Setting a static IP is a small but crucial step for a stable Raspberry Pi network setup. It prevents connection errors and is especially handy in larger home or lab networks. Just make sure the IP address you assign doesn’t conflict with other devices.

Tuesday, 8 July 2025

Learn to Build Your Own Gas Leak Detector with Arduino – Simple DIY Safety Project

Ever thought about how devices can sniff out gas leaks and keep you safe, without you lifting a finger? That’s where a gas leakage detector comes in. It's a simple yet useful project you can build yourself using Arduino. In this guide, we will walk you through how to make your own gas detection system with all the schematics and code you need to get started.

What is a Gas Leakage Detector?

A gas leakage detector uses MQ-5 gas sensor to identify the presence of combustible gases such as LPG, methane, and smoke in the air. When gas concentration exceeds a certain threshold, it triggers a buzzer and alerts users through a connected display or indicator.

Components Required

To build this project, you will need:

  • Arduino Uno
  • MQ-5 Gas Sensor
  • Buzzer
  • LED
  • 16x2 LCD Display (with I2C Module)
  • Resistors
  • Jumper Wires & Breadboard
  • 5V Power Supply

Gas Leakage Detector Using Arduino Project


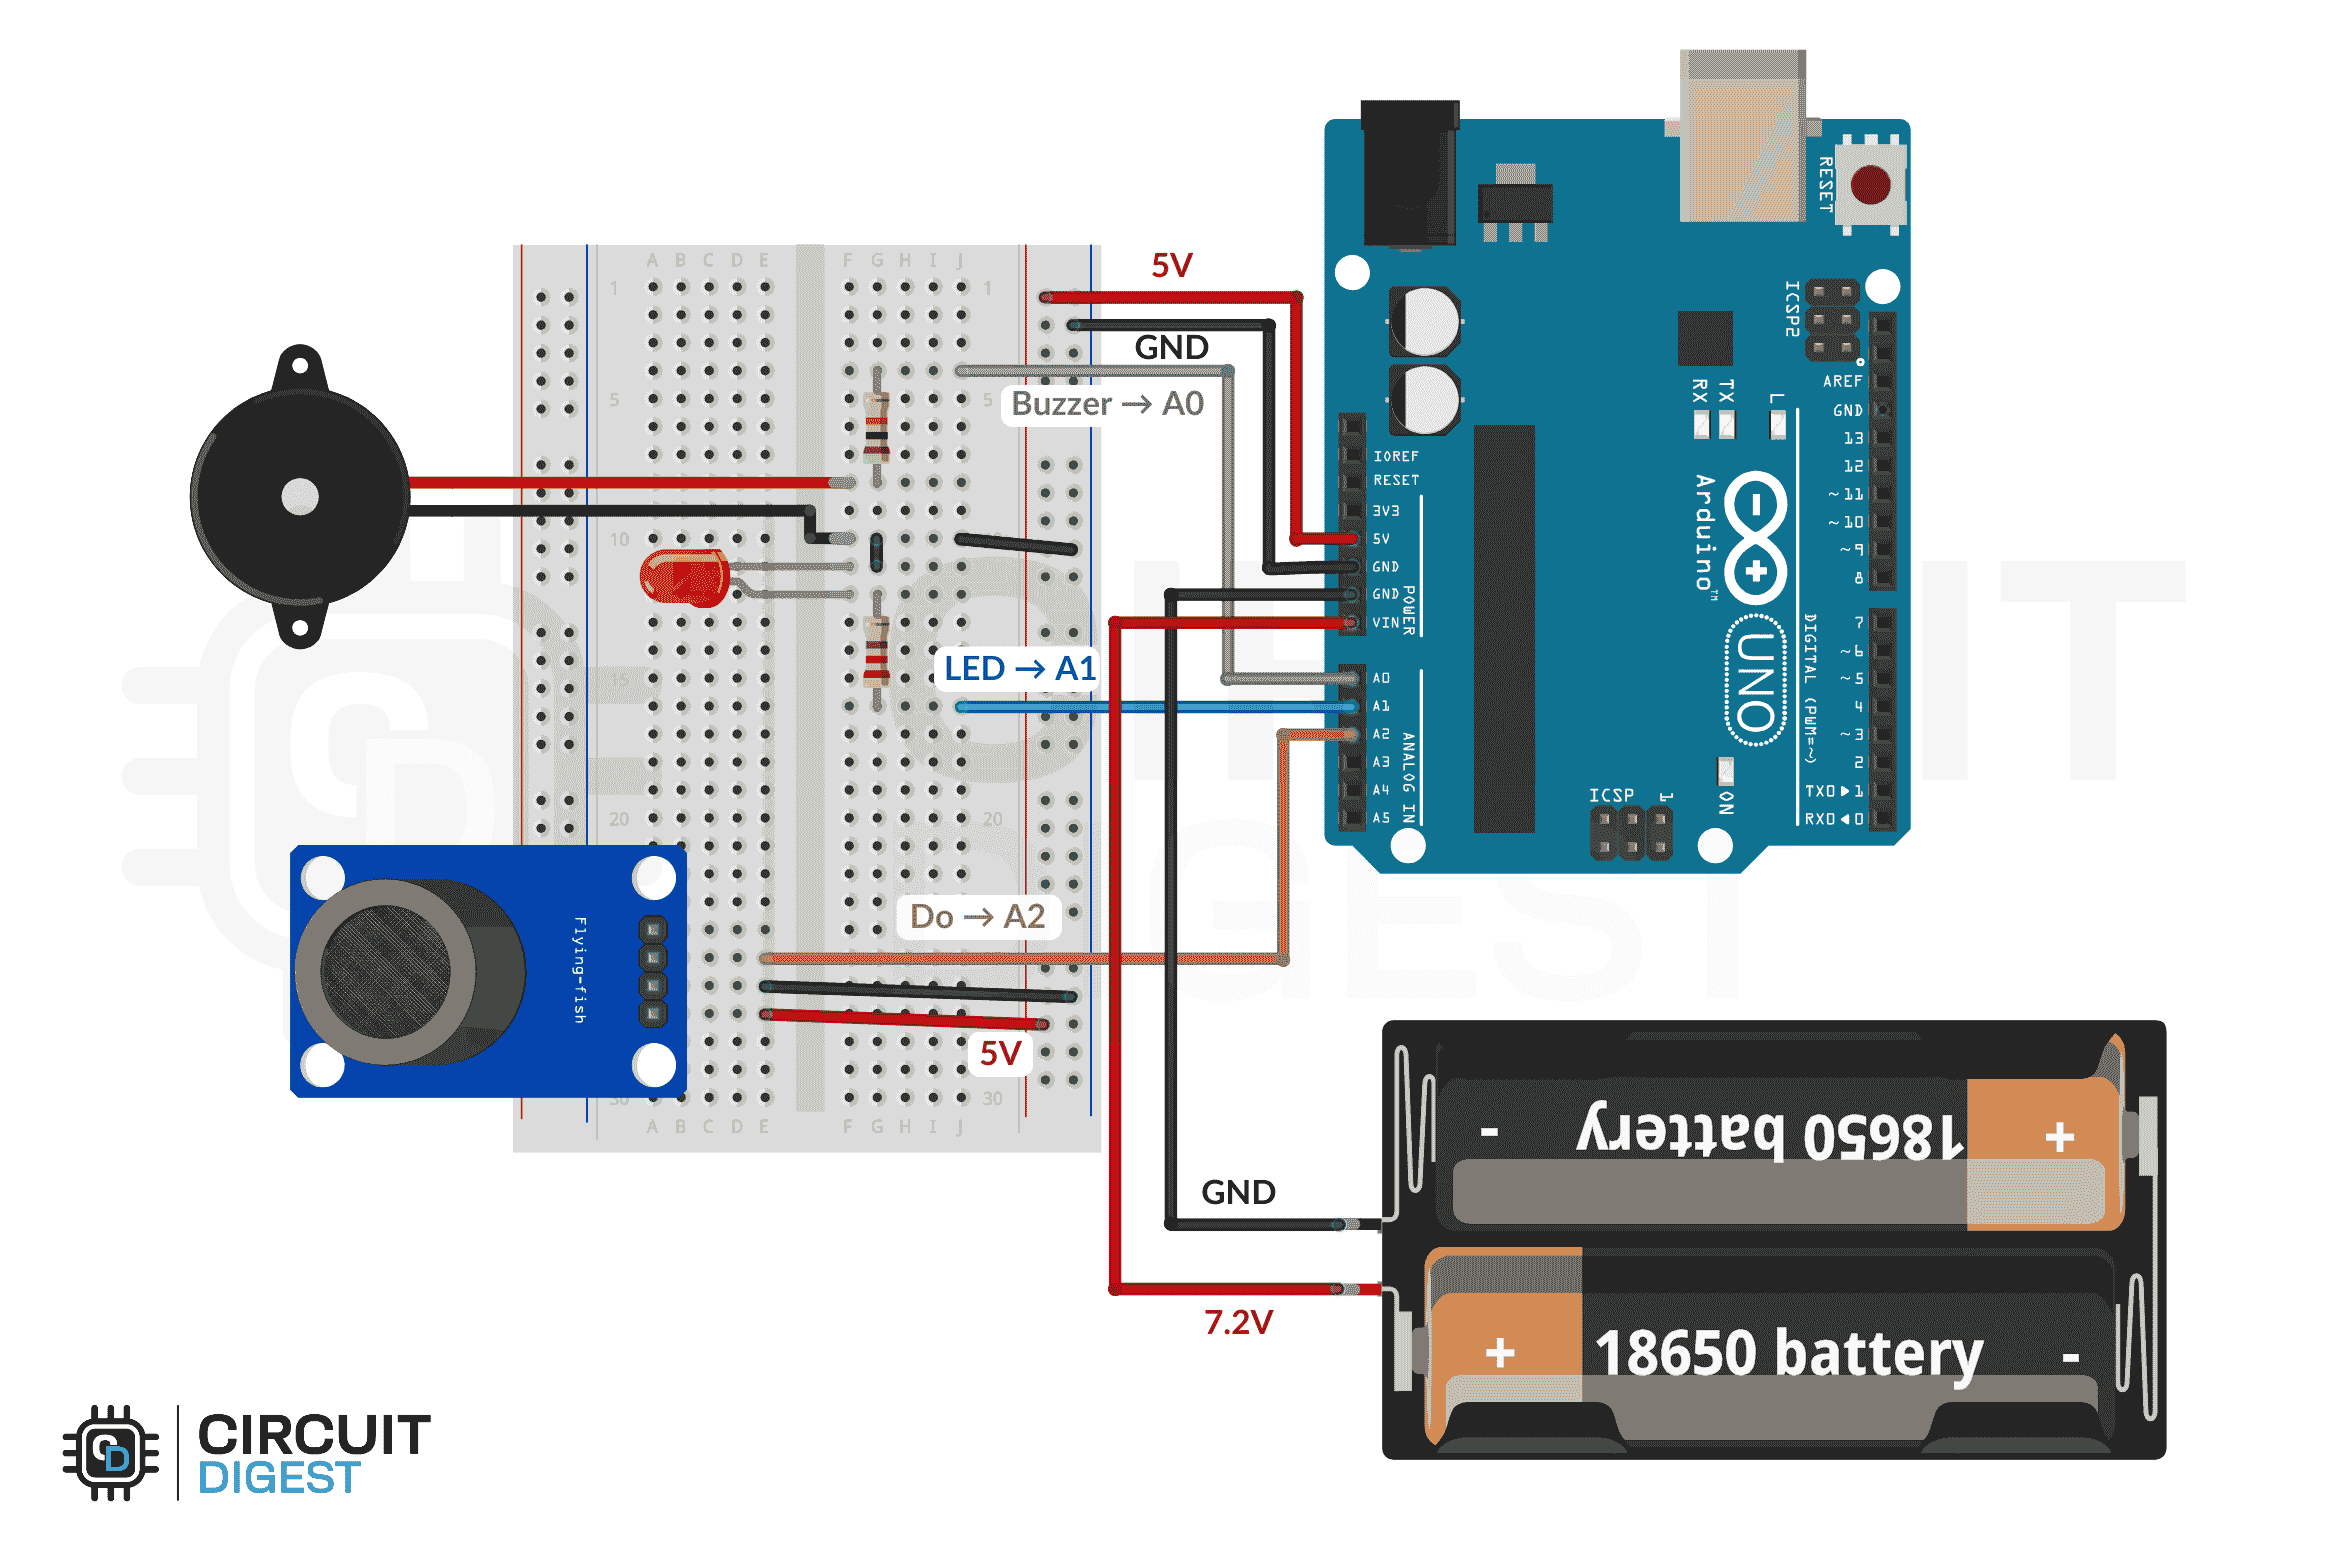
Circuit Diagram of Gas Leakage Detector Using Arduino

The MQ-5 sensor’s digital output goes to pin A2, while a buzzer (on A0) and an LED (on A1) provide alerts when gas is detected. A common ground is shared, and you can also power the system using USB or a regular adapter. When gas is detected, the Arduino turns on a buzzer and LED.

Circuit Diagram of Gas Leakage Detector Using Arduino

Applications of Gas Leakage Detectors

  • Home safety and kitchen monitoring
  • Industrial gas leak detection
  • Smart home automation systems
  • Educational electronics and IoT projects

Click here to explore the project in detail: How to Build a Gas Leakage Detector Using Arduino: Complete DIY Guide

Wednesday, 2 July 2025

RFID-Based Attendance System with Arduino


Keeping track of attendance should not feel like a daily hassle. Whether you are running a classroom, managing a small office, or organizing a community event, a simple, low-cost solution can go a long way. This RFID based attendance system using Arduino reads RFID cards to automatically log check-ins and check-outs, shows updates on an LCD, and stores attendance logs with real-time stamps using an RTC module. It's completely offline and stores data locally, so no need for an internet connection. The total cost is just around $30.

Why Choose Arduino for DIY RFID Attendance Tracker?

Arduino gives you full control over the system’s features without depending on expensive or limited commercial options. The MFRC522 RFID reader is accurate, and combining it with real-time clock and EEPROM modules means your data is both timestamped and safely stored, even during a power cut. Plus, once built, this setup is fully reusable and expandable for future upgrades like IoT integration or door control.

Key Features of RFID based attendance system

  • Automated RFID card scanning for both entry and exit
  • Real-time timestamp logging using DS1307 RTC
  • Local data storage with EEPROM, survives reboots
  • LCD display for live updates
  • Menu navigation via push buttons or serial monitor
  • Customizable card programming with personal data

Overview-Image-of-RFID-Based-Attendance-System-Using-Arduino

Components You’ll Need

  • Arduino Uno
  • MFRC522 RFID Reader
  • DS1307 RTC Module (with built-in AT24C32 EEPROM)
  • 16x2 I2C LCD Display
  • Push Buttons (x2)
  • RFID Cards/Tags
  • Breadboard, jumper wires, and 5V–12V power supply

RFID-Attendance-System-Using-Arduino
Real-World Applications

  • Classrooms – Track student attendance and prevent proxy entries
  • Offices – Log employee in/out times without manual input
  • Gyms & Clubs – Track member usage, ensure hygiene with contactless logging
  • Workshops – Monitor visitor entry or workshop sessions
  • Healthcare & Industry – Touchless logging for safety zones or shift tracking
This RFID based attendance system using Arduino is a great DIY project for anyone looking to solve a real problem while learning valuable electronics and programming skills. It’s affordable, fully offline, and scalable. Once set up, it can handle real-time check-ins, and you will know exactly how every part works.