Showing posts with label ESP32CAM. Show all posts

Thursday, 21 May 2026

Smart AI Vision with ESP32-CAM Object Detection

Object Detection With ESP32-Cam Using CircuitDigest Cloud
AI-based object detection usually sounds complicated. Most people assume you need machine learning knowledge, custom datasets, and expensive hardware to get started. But this ESP32-CAM Object Detection project proves otherwise.

Using the ESP32-CAM module and the CircuitDigest Cloud Object Detection API, you can build a real-time ESP32-CAM object detection with just a push button, WiFi connection, and a few lines of Arduino code. No model training, no Edge Impulse workflow, and no custom dataset preparation required.

How This ESP32-CAM Object Detection System Works

Detected Objects in the Image

The working principle is very simple. When the push button is pressed, the ESP32-CAM captures an image and sends it to the CircuitDigest Cloud through an HTTPS request.

The cloud API processes the image using its built-in object detection engine and returns:

  • Object names
  • Number of detected objects
  • Confidence scores

The detection result is then displayed in the Arduino Serial Monitor.

For example, the system can identify:

  • Mobile phones
  • Laptops
  • Cups
  • Cars
  • Books
  • People
  • Animals

and many other common objects.

Hardware Required

Circuit Diagram Object Detection Project

One reason this project is beginner-friendly is the minimal hardware setup. You only need:

  • ESP32-CAM module
  • Push button
  • Breadboard
  • Jumper wires

If you are using the standard ESP32-CAM without onboard USB, you’ll also need an FTDI programmer for uploading code.

Why Use Cloud-Based Detection?

CircuitDigest Home Page

Traditional AI object detection systems usually require:

  • Dataset collection
  • Image labeling
  • Model training
  • Model optimization

That process can take hours or even days.

With CircuitDigest Cloud, all of that complexity is removed. The cloud already has pre-trained object detection models, so your ESP32-CAM simply captures images and uploads them for analysis.

This makes development much faster and easier, especially for beginners.

Setting Up the Detection System

The setup process is straightforward:

  1. Create a CircuitDigest Cloud account
  2. Select object classes you want to detect
  3. Adjust the confidence threshold
  4. Generate the ESP32-CAM Arduino code
  5. Upload the code using Arduino IDE

Once powered ON, the ESP32-CAM starts working immediately.

The cloud dashboard also lets you:

  • Monitor API usage
  • View previous detection logs
  • Test detection without hardware

Real-Time Detection Results

When the button is pressed, the camera captures an image and uploads it to the cloud.

Within seconds, the Serial Monitor displays results like:

  • Laptop detected → Confidence 92%
  • Phone detected → Confidence 88%
  • Mouse detected → Confidence 84%

Good lighting and proper camera focus significantly improve accuracy.

Common Issues and Fixes

A few common issues beginners may face include:

  • Camera initialization failure
  • Power instability
  • Blurry images
  • Frequent ESP32 restarts

Most of these problems are solved by:

  • Using a stable 5V supply
  • Adjusting the camera lens focus
  • Improving lighting conditions
  • Selecting the correct board settings in Arduino IDE

This ESP32-CAM Object Detection project is an excellent introduction to AI-powered computer vision without the usual complexity of machine learning workflows.

With just an ESP32-CAM and a cloud API, you can build a compact object detection system capable of recognizing real-world objects in seconds. It’s simple, affordable, and surprisingly powerful for DIY AI projects.

https://circuitdigest.com 

Robotics Projects |Arduino Projects | Raspberry Pi Projects|

Friday, 27 February 2026

Indian Currency Recognition using ESP32-CAM and Edge Impulse


ESP32 CAM Currency Recognition System using Edge Impulse

Artificial Intelligence is no longer limited to powerful computers or cloud servers. Today, even compact and affordable boards like the ESP32-CAM can perform real-time image recognition. In this project, we build an ESP32 CAM Currency Recognition capable of identifying currency denominations using Edge AI (TinyML) directly on the device.

This system captures images using the ESP32-CAM, processes them locally using a trained machine-learning model, and identifies the currency note placed in front of the camera. LEDs provide instant visual feedback, while the Serial Monitor displays the detected denomination.

What You’ll Learn

  • TinyML and Edge AI concepts
  • ESP32-CAM camera interfacing
  • Dataset collection and labelling
  • Model training using Edge Impulse
  • Deploying AI models on microcontrollers

How ESP32-CAM Currency Recognition Works

The ESP32-CAM captures an image of the currency note and runs a trained machine-learning model locally. Instead of sending images to the cloud, processing happens directly on the device — known as AI on Edge.

The trained model recognises visual features such as:

  • Colour patterns
  • Text layout
  • Design elements
  • Security markings

Once a denomination is detected:

  • The corresponding LED glows
  • The detected value appears in the Serial Monitor

This enables fast, private, and offline recognition.

Components Required

  • ESP32-CAM Module
  • USB-to-Serial Converter
  • LEDs (for denomination indication)
  • 100Ω Resistors
  • Breadboard
  • Jumper Wires
  • Arduino IDE
  • Edge Impulse Studio
Circuit Diagram of Currency recognition System

System Workflow

The project follows three major stages:

1. Dataset Collection

Images of Indian currency notes (₹10, ₹20, ₹50, ₹500, etc.) are captured using the ESP32-CAM web interface.
A plain background and proper lighting improve accuracy.

2. Model Training using Edge Impulse

Images are uploaded and labelled in Edge Impulse.
The platform:

  • Processes image features
  • Trains an object detection model
  • Evaluates accuracy using performance metrics

The trained model is then exported as an Arduino library.

3. Deployment on ESP32-CAM

The trained model is uploaded through Arduino IDE.
After deployment, the system works completely offline.

Hardware Setup of Currency Recognition System

Hardware Setup

The ESP32-CAM connects to a USB-to-Serial converter for programming. LEDs are connected to GPIO pins through resistors, where each LED represents a specific currency denomination.

When a note is placed under the camera:

  • Image is captured
  • Model processes the frame
  • Matching denomination LED turns ON

Real-World Performance

For reliable detection:

  • Keep the camera fixed at a stable angle
  • Maintain consistent lighting
  • Ensure the full note is visible

Under proper conditions, the system successfully recognises different Indian currency notes in real time.

Applications

  • Assistive device for visually impaired users
  • Automated retail currency validation
  • Smart vending machines
  • Currency counting systems

This ESP32-CAM Currency Recognition project demonstrates how embedded AI and TinyML can bring intelligent vision capabilities to low-cost hardware. Using Edge Impulse simplifies the entire workflow - from data collection to deployment - making edge AI accessible even for students and hobbyists.

By combining computer vision with microcontrollers, this project opens the door to real-world applications in automation, accessibility, and smart financial systems. It’s a powerful example of how modern embedded systems can see, analyse, and respond intelligently - all without the cloud.

https://circuitdigest.com 

Robotics Projects |Arduino Projects | Raspberry Pi Projects|

Wednesday, 17 April 2024

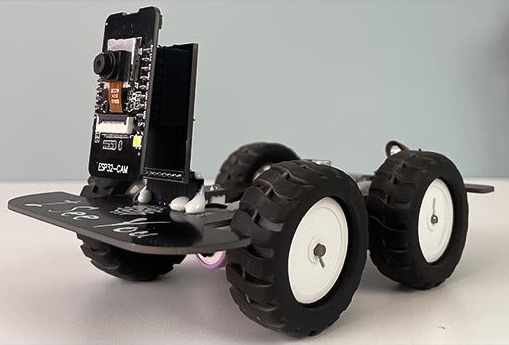
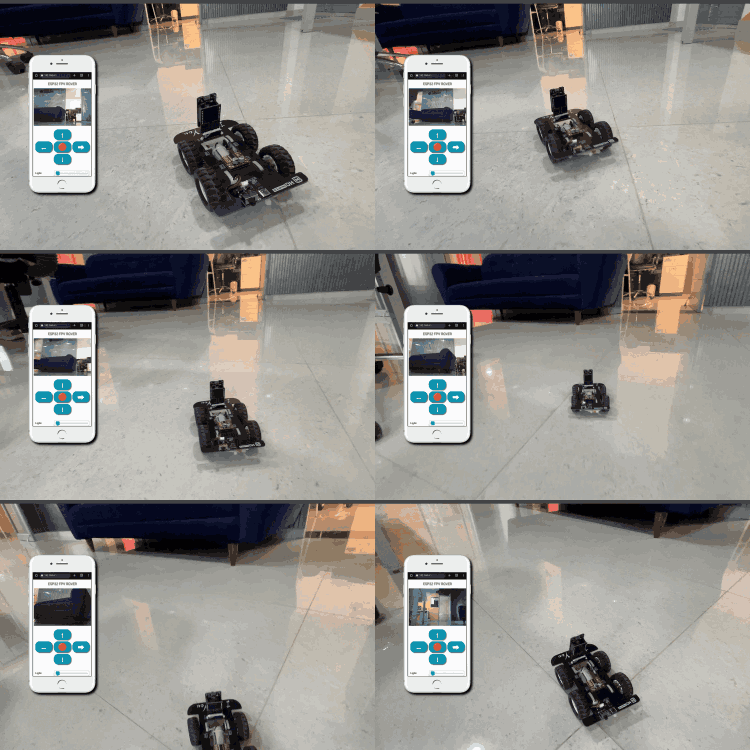
DIY WiFi-Controlled ESP32 Cam Surveillance Car: Build Your Own Remote-Control Adventure!

 This project is perfect for anyone keen on learning about ESP32-based devices and remote-controlled systems. We'll be using the ESP32 camera module to build a surveillance car that's not only energy-efficient but also budget-friendly. Let's get started!


What's the ESP32 Cam Surveillance Car All About?


The ESP32 Cam Surveillance Car project showcases the versatility of the ESP32 projects platform. It's a step-by-step guide to building a remote-controlled car and understanding its components.


Key Features and Components


ESP32 Cam Module: This is the brain of our surveillance car, providing WiFi connectivity and camera functionality.

Web Controls: Allows you to control the car remotely via a web interface—no extra hardware needed!

Affordable Design: We've designed this project with readily available components, perfect for hobbyists and learners.

Open-Source: Feel free to customize and learn from our design files and code.

Compact and Portable: Designed to be compact and easy to carry around—great for educational purposes.

Scalable and Upgradable: There's room for expansion and future enhancements.

Required Components


To build your ESP32 Cam Surveillance Car, you'll need:


ESP32 Camera Module

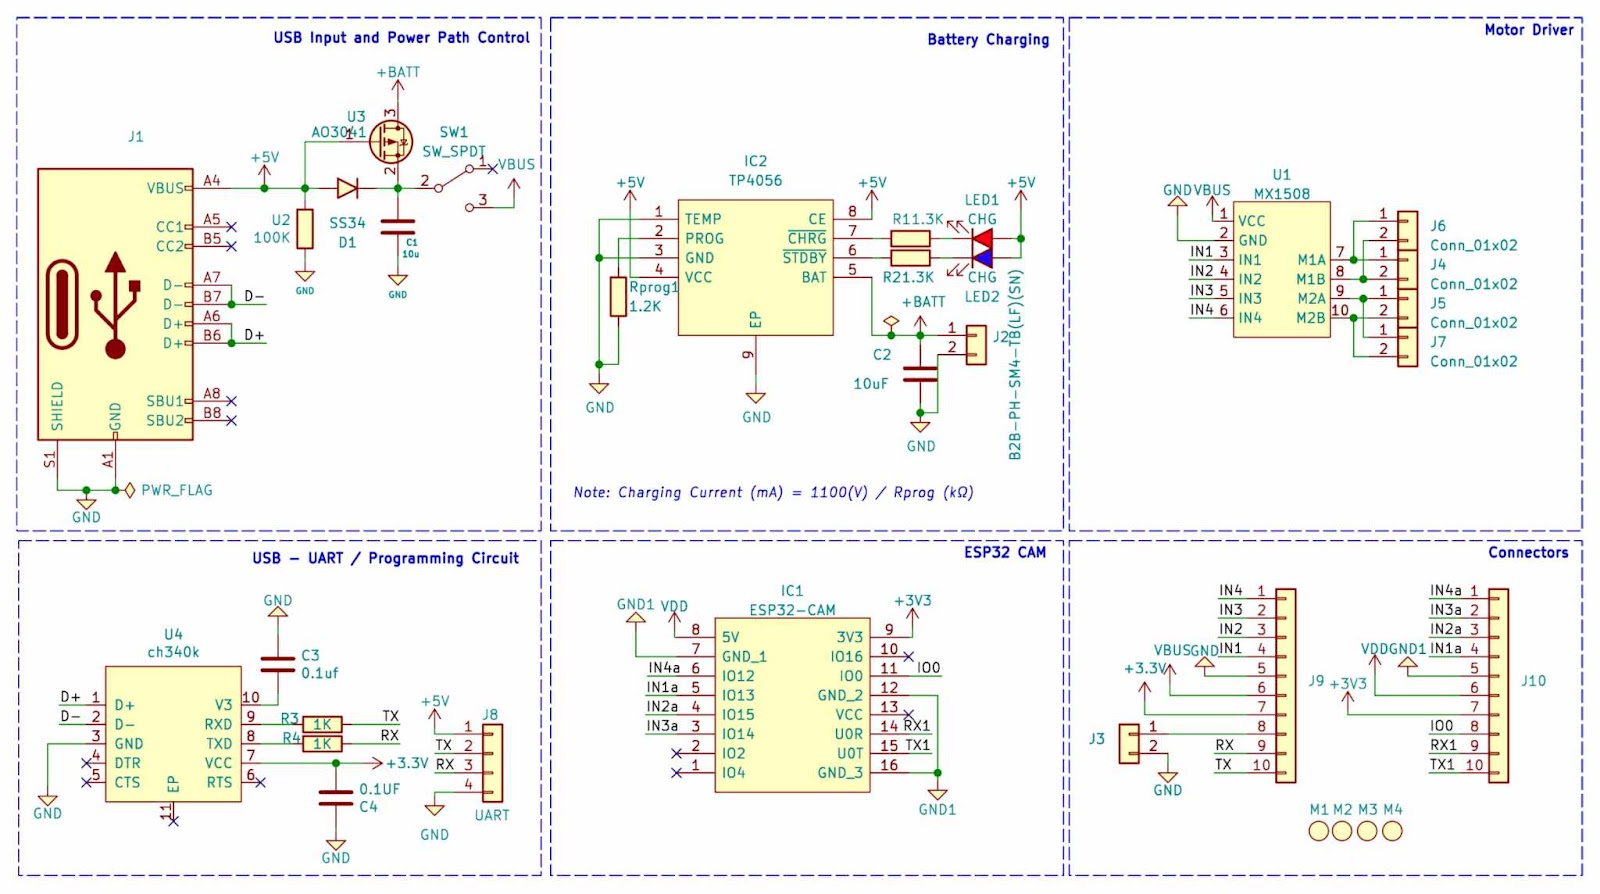
CH340K USB-UART controller

TP4056 Li-ion charger IC

MX1508 motor driver module

AO3401 P-MOSFET

Type C USB Connector

LiPo Battery

N20 Motors and 44mm wheels

SMD resistors, capacitors, and LEDs

Slide Switch, Connectors, Custom PCB, Mounting screws, and other tools


Circuit Design

The circuit diagram is straightforward and divided into sections for USB Type C Port, Battery Charger Circuit, Programming Circuit, and Motor Driving Section.


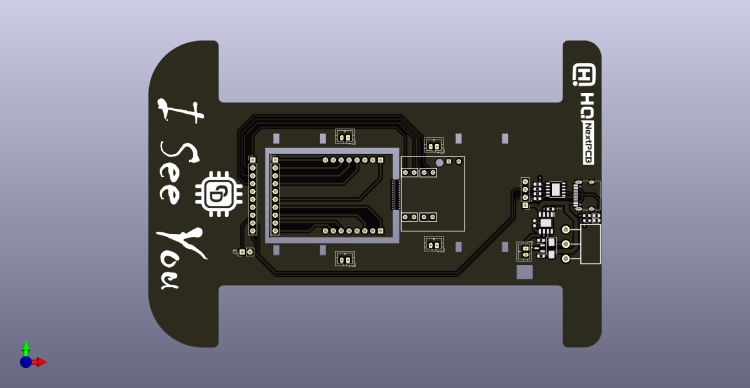
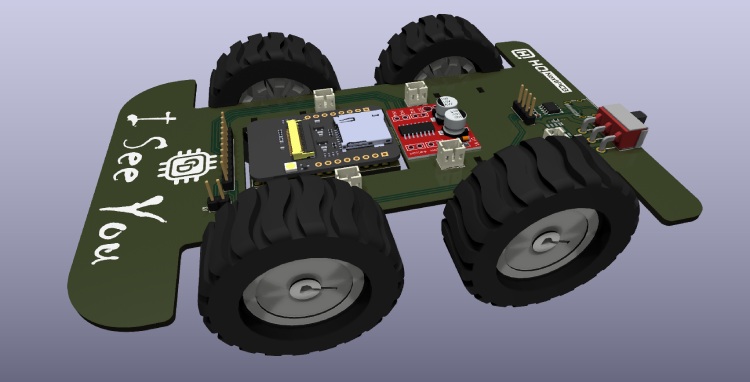
Custom PCB Design

We provide custom PCB design files for easy replication and modification. You can order the PCB from a manufacturer like NextPCB.


Assembly Process

Follow simple steps for assembly, including soldering components, integrating modules, setting up motors and battery, and testing connections.


Programming the Surveillance Car

Set up the Arduino IDE, install ESP32 core and required libraries, customize the code with your WiFi credentials, upload it to the ESP32 Cam module, and start controlling the car remotely through a web interface!


Building this ESP32 Cam Surveillance Car is not just a project—it's an exciting journey into IoT and remote control systems. Whether you're a beginner or enthusiast, this project will surely expand your skills and knowledge in ESP32 development.