Monday 23 November 2020

DIY Portable Arduino Weighing Machine using Load Cell


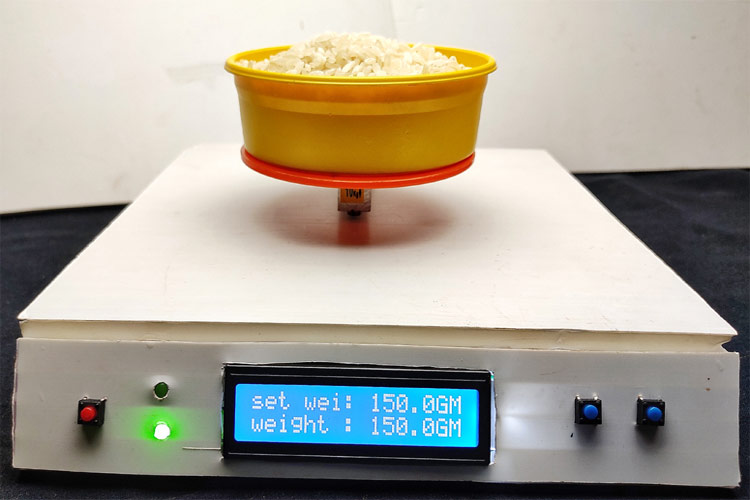
This weighing machine is perfect for local stores, where they pack items in bulk quantity. Like commercial products, our weight scale will have a zero button that zeroes out the scale. Also, It has an option to set weight for measurement, when the measuring weight reaches the set weight, a buzzer beeps fast and stops when the set weight equals the measuring weight. This way, the user can pack it just by hearing the sound and would not have to look at the display. As this is a very simple project, we will be building this very easily using components like Arduino and strain gauge load cell. 


Watch the below video for the complete working of this Arduino Weighing Machine.


Get the circuit diagram, code and required instructions to build the project in this tutorial.


Thursday 12 November 2020

Using Arduino Millis() Function for Multi-tasking

This tutorial covers performing Multitasking with Arduino millis function. Generally a delay() function is used in Arduino for a periodic task like LED Blinking but this delay() function halt the program for some definitive time and don’t allow other operations to perform. So this article explains how we can avoid use of delay() function and replace it with millis() to perform more than one tasks simultaneously and make the Arduino a Multitasking controller. Before going into detail let’s start with understating Multitasking.

To learn how to make the circuit and write code for performing multitasking in the this detailed Arduino Millis tutorial

Below you can watch the demonstration video:

Thursday 5 November 2020

How to Build a Compact and Low Power Solid-State Relay to Control AC Home Appliances using ESP8266

The best alternative for an electromechanical relay is a solid-state relay. A solid-state relay is a type of semiconductor-based relay that can be used as a substitute for an electromechanical relay to control electrical loads.


In this project, we will make a Solid-State Relay using a single component and we will control an AC load in 230VAC operation. The specification used here is limited, we have chosen 2A of Load to be operated using this Solid-State-Relay. The aim is to build a compact PCB for a solid state relay that could be directly interfaced and controlled with the 3.3V GPIO pins of Nodemcu or ESP8266. To accomplish that we have fabricated our PCB boards from PCBWay and we will assemble and test the same in this project.
View the full project tutorial

Watch the video below: